Contents
- Introduction
- Configuration
- Scenarios
- Features and Usage
Scenario Blocks
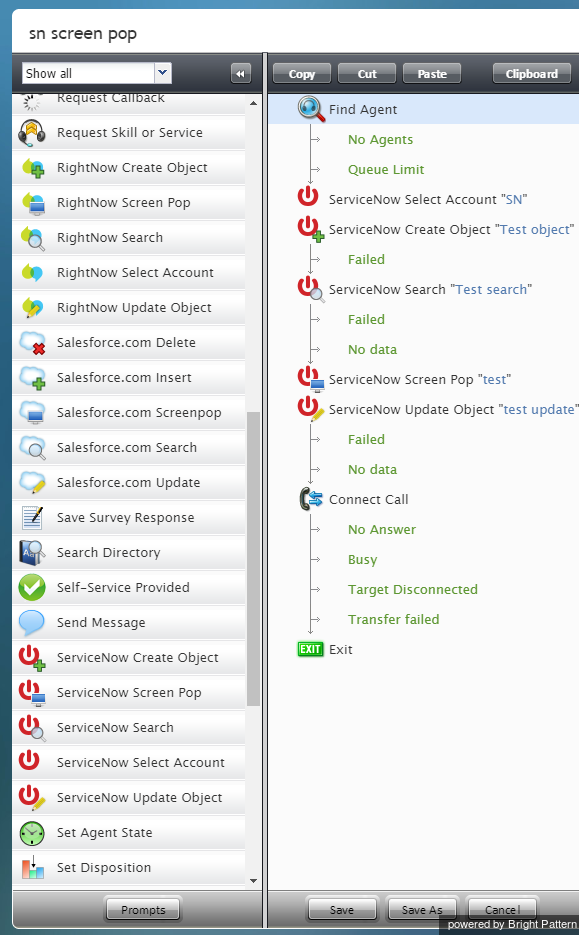
After you have set up your ServiceNow integration account, you are able to create and edit scenarios within the Scenario Builder application. The following steps will walk you through the process of creating a scenario with ServiceNow scenario blocks, such as the example scenario shown.
How to Create a ServiceNow Scenario
In the Contact Center Administrator application, navigate to Configuration > Scenarios > Voice.
Click the Add scenario + button to add a new scenario, or select a scenario template to edit.
The scenario will open in the Scenario Builder application. Before you do anything else, save your scenario by clicking the Save As button and giving this scenario a unique name.
How to Build a Scenario with Blocks
To access ServiceNow data from a scenario, drag the following scenario blocks onto your scenario, in this order:
- Find Agent
- ServiceNow Select Account
- ServiceNow Create Object
- ServiceNow Search
- ServiceNow Screen Pop
- ServiceNow Update Object
- Connect Call
These blocks build a basic ServiceNow scenario, which will be used as an example in the following descriptions of this guide.
Find Agent
The Find Agent block finds the best matching agent to answer the call according to requested skills. More information about Find Agent screen properties is available in the Scenario Builder Reference Guide.
ServiceNow Select Account
The ServiceNow Select Account block is used to specify the integration account that will be used by ServiceNow blocks in the given scenario. You can create multiple ServiceNow integration accounts for access to different ServiceNow systems. This block is useful only if you have more than one ServiceNow integration account.
If the ServiceNow Select Account block is not used, all ServiceNow blocks in the given scenario will access data from the integration account marked as Default account.
Settings for ServiceNow Select Account are described as follows:
- Title text – Title text is the name of the block instance.
- Account – Account is the name of the ServiceNow integration account that will be used for access to ServiceNow data by subsequent ServiceNow blocks in the given scenario.
ServiceNow Create Object
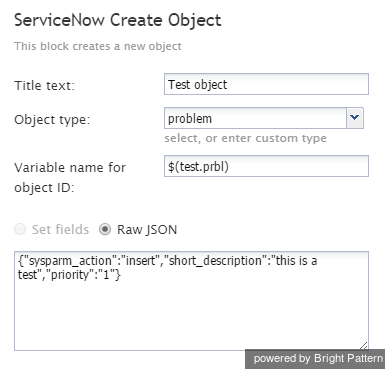
The ServiceNow Create Object block is used to create new objects in ServiceNow.
You must specify the settings for this new object on the Settings pane. These settings are described as follows:
- Title text - Title text is the name of the block instance.
- Object type – The object type is the type of ServiceNow object to be created. You can either select one of the standard objects from the drop-down menu or enter the name of the desired custom object type.
- Variable name of object ID – This is the name of the variable that will be used as an identifier for the ServiceNow object to be created. It will be set only if the block succeeds.
- Set fields – This setting is reserved.
- Raw JSON – Clicking Raw JSON enables object properties to be specified in JSON format.
ServiceNow Search
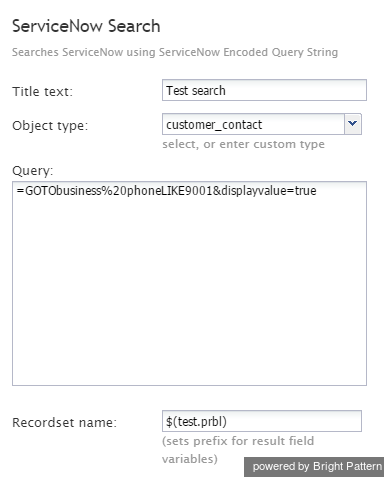
The ServiceNow Search block is used to obtain ServiceNow data.
You must specify the search settings on the Settings pane. These settings are described as follows:
- Title text - Title text is the name of the block instance.
- Object type – The object type (e.g., “problem” or “incident”) is selected from the drop-down menu or entered manually as a custom object.
- Query – Query is the record selection statement. It may contain application variables specified as $(varname).
- Recordset name – This is the name of the recordset that will be retrieved via this search operation. The recordset name is the same as the value that you entered for Variable name of object ID in the ServiceNow Create Object block.
ServiceNow Screen Pop
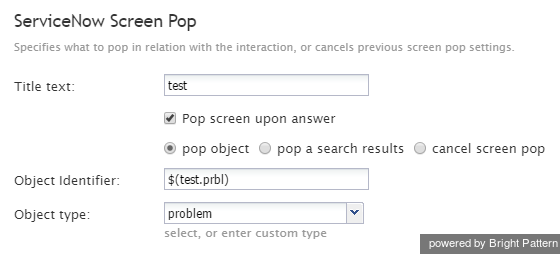
The ServiceNow Screen Pop block is used to synchronize the delivery of calls and related ServiceNow records to agents; records can be retrieved using either object IDs or predefined ServiceNow reports with multiple selection criteria.
ServiceNow Screen Pop settings are described as follows:
- Title text - Title text is the name of the block instance.
- Pop screen upon answer – By default, the screen-pop occurs as soon as the interaction is delivered to the agent (i.e., during the alert phase); select this checkbox if you want the screen-pop to occur when the agent accepts the interaction for handling.
- pop object – Use this option when the scenario can precisely identify the object associated with the interaction using object ID. A ServiceNow page with the object properties will be displayed to the agent.
- pop search results – Use this option to run a predefined ServiceNow report for object selection. The results of the report will appear on the agent's screen.
- Report ID – Report ID is the identifier of the ServiceNow report to be run for object selection.
- cancel screen pop – The available interaction data cannot be used to identify any relevant ServiceNow records. This option will cancel screen-pop of a specific ServiceNow page that may have been set by a previous use of this block in the same scenario.
- Object Identifier – This is the identifier of the ServiceNow object to be displayed. The Object Identifier must be specified if the Object option is selected. Note that the Object Identifier is the same as the value that you entered for Variable name of object ID in the ServiceNow Create Object block. It may be specified as an application variable in form $(varname).
- Object type – Object type is the type of the ServiceNow object to be displayed. This is selected from the drop-down menu or typed in manually as a custom object type.
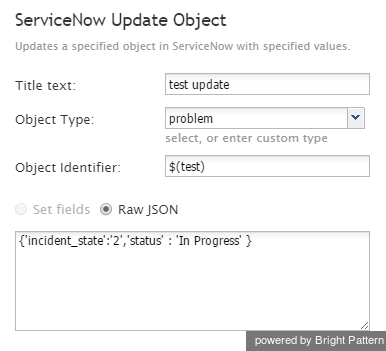
ServiceNow Update Object
The ServiceNow Update Object block is used to update existing ServiceNow records.
As with the other blocks, you must specify the settings for this block on the Settings pane. These settings are described as follows:
- Title text – Title text is the name of the block instance.
- Object Type – Object Type is the type of the ServiceNow object to be created. You can either select one of the standard objects from the drop-down menu or enter the name of the desired custom object type.
- Object Identifier – This is the identifier of the object to be updated.
- Set fields – This setting is reserved.
- Raw JSON – Raw JSON enables object properties to be specified in JSON format.
Connect Call
The Connect Call block connects a call to the destination specified in the $(destination) variable (typically, the extension of the agent found by the preceding Find Agent block). If the destination extension has an agent logged in, the system tracks the agent’s state according to the state of the call. The block handles call transfers and conferences internally and only ends when the remote party disconnects or the last agent on the call disconnects.
For more information on the Connect Call block, refer to the Scenario Builder Reference Guide, section Connect Call.
Refer to the Scenario Builder Overview for additional supporting documentation on scenarios and scenario blocks.

