Contents
- Introduction
- Integration Steps
- Prerequisites
- Importing a Call Center Definition File
- Installing a Managed Package
- Configuring Call Center Parameters
- Enabling Single Sign-On
- 1 Enabling SFDC Data Access from Scenarios
- 1.1 In Salesforce Lightning
- 1.1.1 Step 1: Create a new connected app
- 1.1.2 Step 2: Configure the connected app
- 1.1.3 Step 3: Update the earlier created Bright Pattern Contact Center/Salesforce.com integration account
- 1.1.4 Step 4: Update the security profile to include the new connected app
- 1.1.5 Step 5: Update the Bright Pattern Contact Center Administrator application
- 1.1.6 Step 6: Edit your Salesforce.com scenario
- 1.2 In Salesforce Classic
- 1.2.1 Step 1: Create a new connected app
- 1.2.2 Step 2: Configure the connected app
- 1.2.3 Step 3: Update the earlier created Bright Pattern Contact Center/Salesforce.com integration account
- 1.2.4 Step 4: Update the security profile to include the new connected app
- 1.2.5 Step 5: Update the Bright Pattern Contact Center Administrator application
- 1.2.6 Step 6: Edit your Salesforce.com scenario
- 1.1 In Salesforce Lightning
- Importing Calling Lists and Exporting Campaign Results
- Customizing SFDC Activity Objects
- Configuring SFDC Data Screen Pop for Outbound Preview Campaigns
- Frequently Asked Questions
- Searching for a contact using the Salesforce.com Search block
- Locating or Creating Screen Pop URLs for an SFDC Object
- Preventing the Salesforce.com screen pops from opening another tab
- Enabling the Service Console (or Service Cloud)
- Pausing and Resuming Recordings
- How to Remove SFDC Integration
Enabling SFDC Data Access from Scenarios
The server-side integration is implemented using Saleforce.com (SFDC) web services via the SFDC REST API (http://wiki.developerforce.com/page/REST_API).
Bright Pattern Contact Center authenticates with Salesforce using the Web Server OAuth Authentication flow. The refresh token mechanism is used to obtain and refresh the access token.
In Salesforce Lightning
Step 1: Create a new connected app
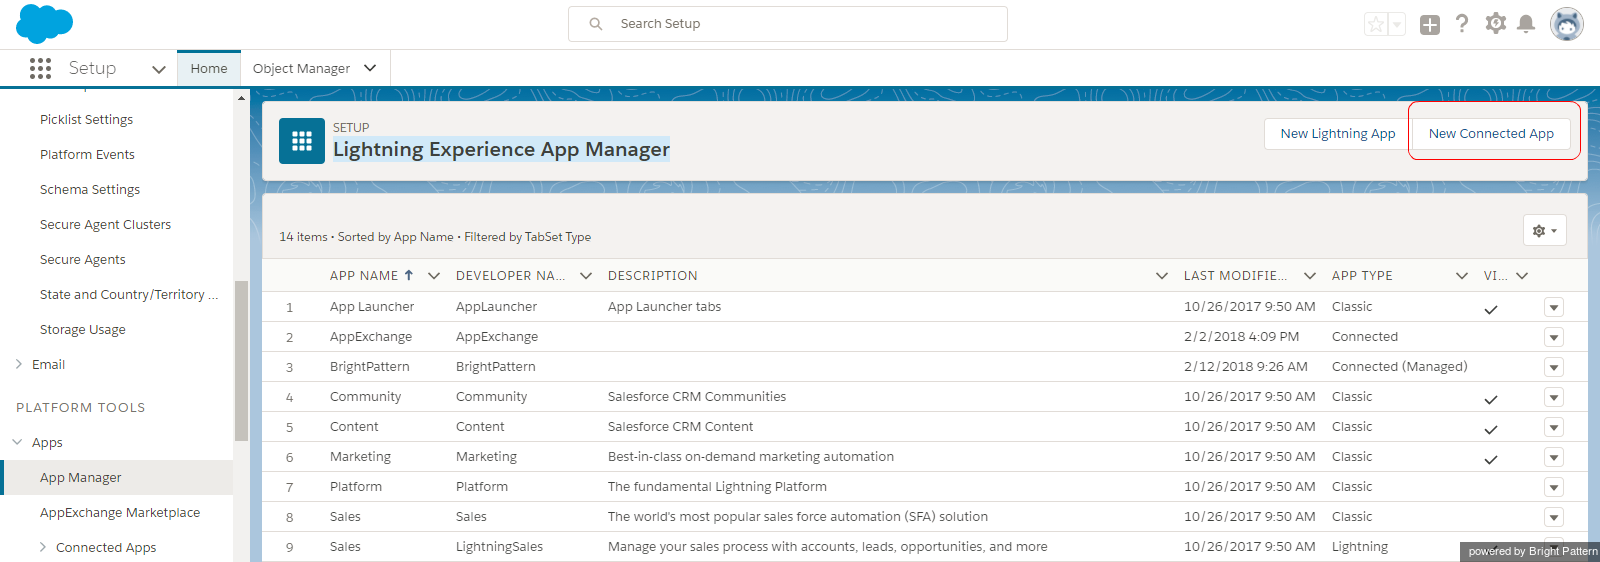
- In Salesforce Lightning, go to Platform Tools > Apps > App Manager.
- At the top of the Lightning Experience App Manager, under Connected Apps, click New.
Step 2: Configure the connected app
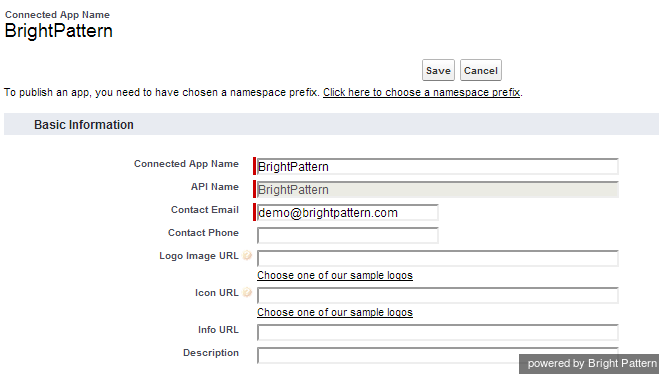
To configure the connected app, enter the following details on the New Connected App page.
Basic information
- Connected App Name - Set any unused name as a Web App Name
- API Name - Set any unused name as an API Name
- Contact Email - Supply contact email
API (Enable OAuth Settings)
- Check the Enable OAuth settings at API (Enable OAuth Settings) > Enable OAuth Settings
- Callback URL - https://<your-brightpattern-domain>/admin/salesforcecallback.html
- Select Available OAuth Scopes.
- Then access and manage your data (API).
- Full access (full)
- Perform requests on your behalf at any time (refresh_token, offline_access).
- Click Save.
Note: The SFDC updates for these parameters take a few minutes to propagate through the system--wait five minutes while SFDC updates these settings internally.
Step 3: Update the earlier created Bright Pattern Contact Center/Salesforce.com integration account
- Log in to the Bright Pattern Contact Center Administrator application, and go to Configuration > Call Center Configuration > Integration Accounts > Salesforce.com.
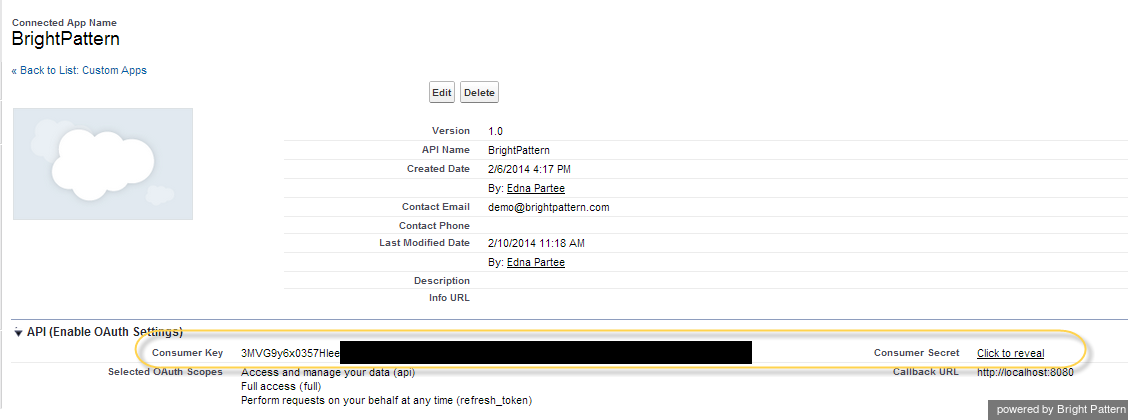
- In the integration account properties, add the consumer key and consumer secret obtained from the connected app created above.
- In Salesforce.com, go to App Setup > Apps > Connected Apps, and select the connected app created earlier.
- Copy the Consumer key and Consumer secret directly from the connected app.
- Go back to Contact Center Administrator, and paste the the consumer key and secret into the integration account properties.
Step 4: Update the security profile to include the new connected app
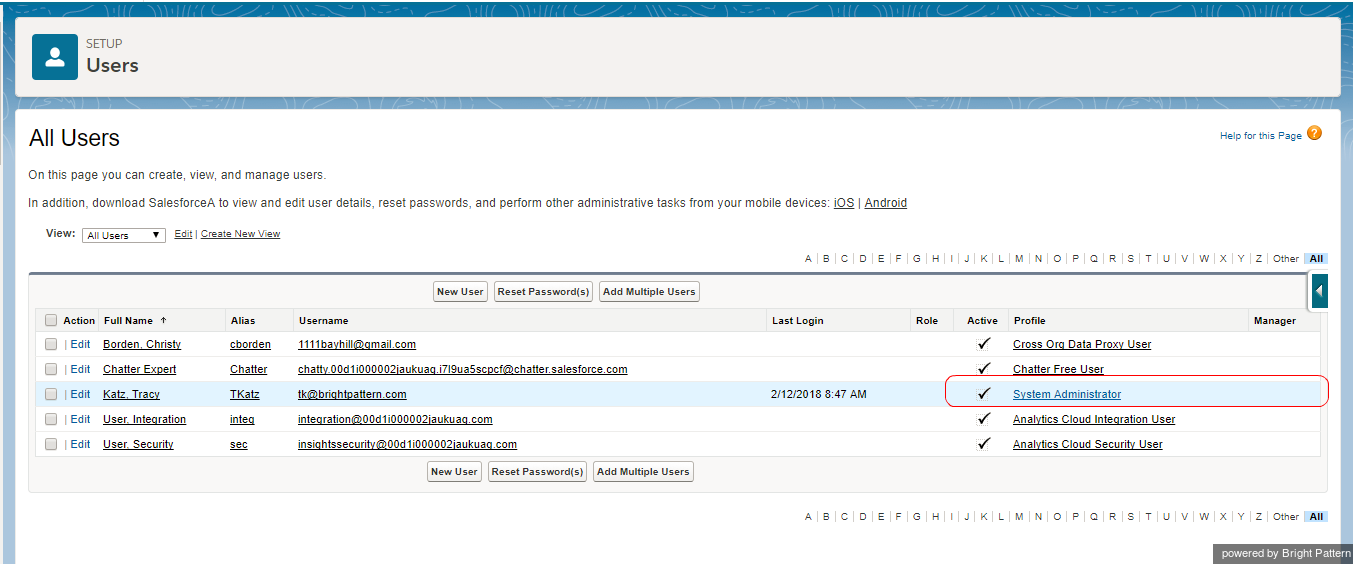
- In Salesforce.com, go to Administration > Users to get to the All Users page.
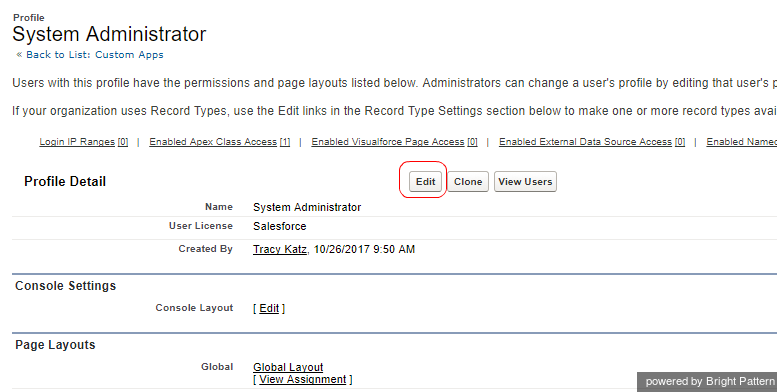
- A list of users will be shown. In the Profiles column, click System Administrator.
- The Profile Detail page will open. Click Edit.
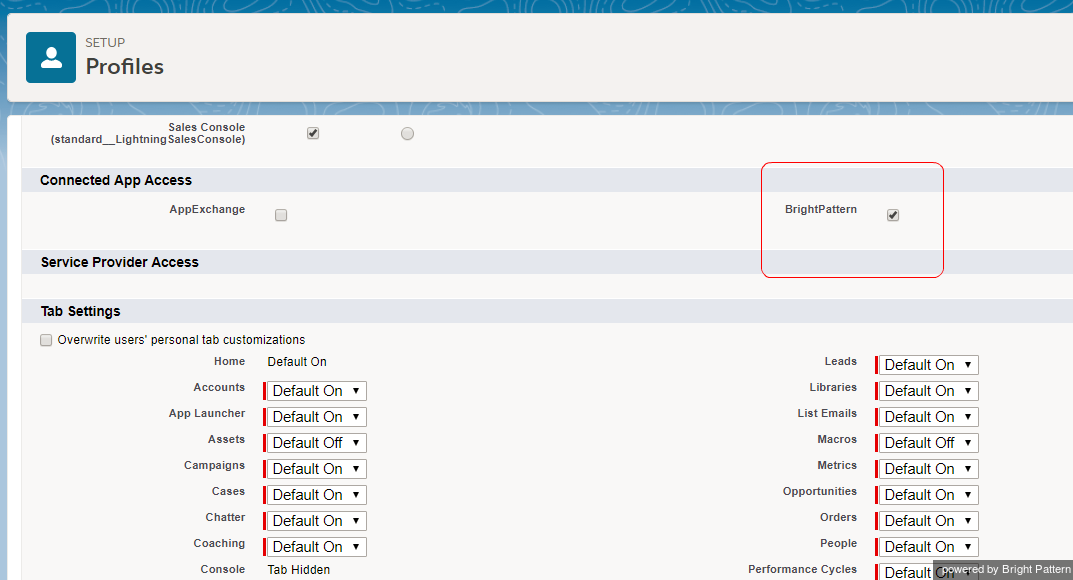
- In Connected App Access, check the connected app created earlier.
- Click Save.
Step 5: Update the Bright Pattern Contact Center Administrator application
In Contact Center Administrator application, open the Salesforce integration account that you added previously. Go to Configuration > Call Center Configuration > Integration Accounts > Salesforce.com.
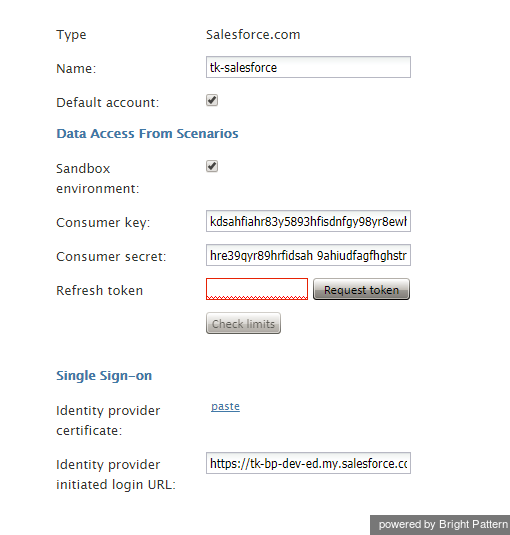
Under Data Access from Scenarios, specify the following data:
- Sandbox environment - If your SFDC environment is a sandbox, select the Sandbox environment checkbox.
- Consumer key - The consumer key
- Consumer secret - The consumer secret
- Refresh token - Click the Request token button to get a new token
The Salesforce integration account configuration should now be complete. You can use the Check limits button to see the SFDC limits associated with this account.
Step 6: Edit your Salesforce.com scenario
In the Scenario Builder application, edit your Salesforce.com scenario to include the following scenario blocks. These blocks allow your contact center to access SFDC data and enable screen pop:
- Salesforce.com Search to obtain SFDC data using either the Salesforce Object Query Language (SOQL) or Salesforce Object Search Language (SOSL)
- Saleforce.com Insert to insert new SFDC records (i.e., to create new instances of SFDC objects)
- Salesforce.com Update to update existing SFDC records
- Salesforce.com Delete to delete existing SFDC records
- Salesforce.com Screen pop to display SFDC records on the Agent Desktop application
- Attached Data to populate custom fields in SFDC activity history
Bright Pattern Contact Center Administrator provides a scenario template for a simple inbound workflow involving look-ups and screen pop of SFDC data.
In Salesforce Classic
Step 1: Create a new connected app
To create a new connected app:
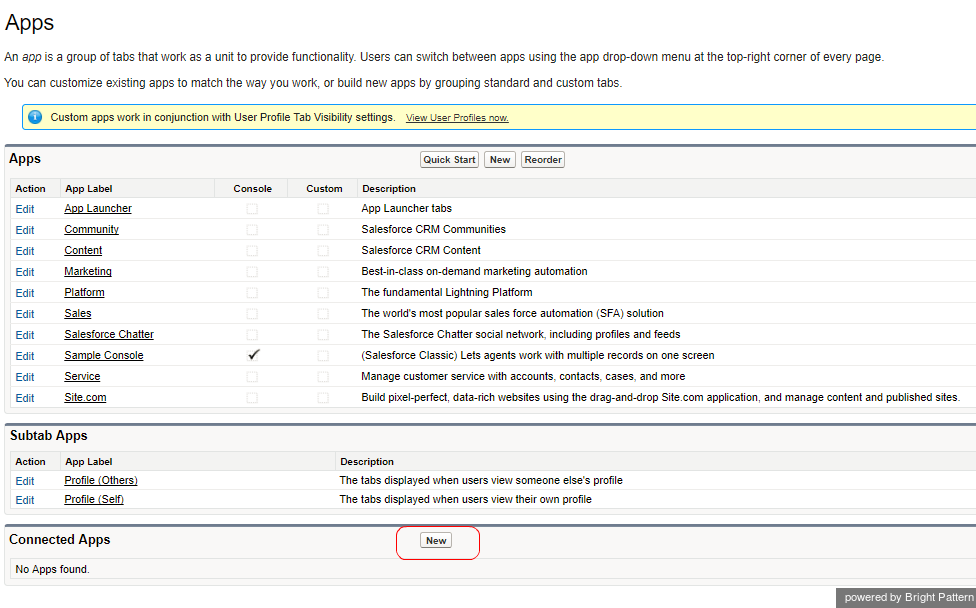
- In Salesforce Classic, go to Build > Create > Apps.
- At the bottom of the Apps list, under Connected Apps, click New.
Step 2: Configure the connected app
To configure the connected app, enter the following details on the New Connected App page.
Basic information
- Connected App Name - Set any unused name as a Web App Name
- API Name - Set any unused name as an API Name
- Contact Email - Supply contact email
API (Enable OAuth Settings)
- Check the Enable OAuth settings at API (Enable OAuth Settings) > Enable OAuth Settings
- Callback URL - https://<your-brightpattern-domain>/admin/salesforcecallback.html
- Select Available OAuth Scopes.
- Then access and manage your data (API).
- Full access (full)
- Perform requests on your behalf at any time (refresh_token, offline_access).
- Click Save.
Note: The SFDC updates for these parameters take a few minutes to propagate through the system--wait five minutes while SFDC updates these settings internally.
Step 3: Update the earlier created Bright Pattern Contact Center/Salesforce.com integration account
- Log in to the Bright Pattern Contact Center Administrator application, and go to Configuration > Call Center Configuration > Integration Accounts > Salesforce.com.
- In the integration account properties, add the consumer key and consumer secret obtained from the connected app created above.
- In Salesforce.com, go to App Setup > Apps > Connected Apps, and select the connected app created earlier.
- Copy the Consumer key and Consumer secret directly from the connected app.
- Go back to Contact Center Administrator, and paste the the consumer key and secret into the integration account properties.
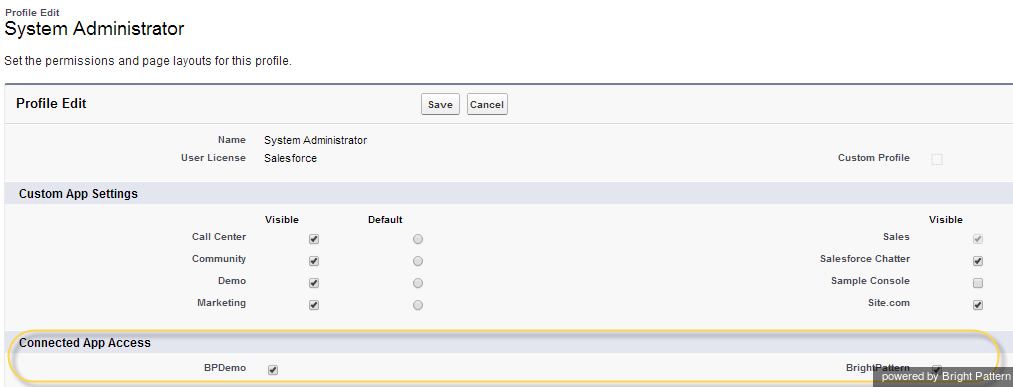
Step 4: Update the security profile to include the new connected app
- In Salesforce.com, from Administer (or Administration > Setup), select Manage Users > Profiles.
- Click System Administrator.
- Click Edit.
- In Connected App Access, check the connected app created earlier.
- Click Save.
Step 5: Update the Bright Pattern Contact Center Administrator application
In Contact Center Administrator application, open the Salesforce integration account that you added previously. Go to Configuration > Call Center Configuration > Integration Accounts > Salesforce.com.
Under Data Access from Scenarios, specify the following data:
- Sandbox environment - If your SFDC environment is a sandbox, select the Sandbox environment checkbox.
- Consumer key - The consumer key
- Consumer secret - The consumer secret
- Refresh token - Click the Request token button to get a new token
The Salesforce integration account configuration should now be complete. You can use the Check limits button to see the SFDC limits associated with this account.
Step 6: Edit your Salesforce.com scenario
In the Scenario Builder application, edit your Salesforce.com scenario to include the following scenario blocks. These blocks allow your contact center to access SFDC data and enable screen pop:
- Salesforce.com Search to obtain SFDC data using either the Salesforce Object Query Language (SOQL) or Salesforce Object Search Language (SOSL)
- Saleforce.com Insert to insert new SFDC records (i.e., to create new instances of SFDC objects)
- Salesforce.com Update to update existing SFDC records
- Salesforce.com Delete to delete existing SFDC records
- Salesforce.com Screen pop to display SFDC records on the Agent Desktop application
- Attached Data to populate custom fields in SFDC activity history
Bright Pattern Contact Center Administrator provides a scenario template for a simple inbound workflow involving look-ups and screen pop of SFDC data.

