Contents
- Introduction
- Configuration
- Prerequisites
- Zendesk Integration Setup
- Single Sign-On Setup
- Screen-Pop
- Accessing Zendesk Data from Scenarios
- Features and Usage
- Integrated Agent Desktop
- Built-In Softphone and Click-to-Call
- Live Chat and SMS
- Activity History
- Call Center Supervisor
- Using Zendesk Integration Scenario Blocks
- 1 Zendesk Screen-Pop
- 2 Configuring Screen-Pop
Zendesk Screen-Pop
Screen-Pop is a useful feature that automatically pushes relevant data about a customer or ticket to the agent who is handling the interaction. This feature may be used to facilitate better customer interactions, as well as to launch outbound campaigns.
If you are running a business, chances are that you will plan an outbound campaign service or two. A campaign is a type of service in which a contact center proactively initiates interactions with customers for a specific reason, such as for surveys or telemarketing, using destination data in the associated calling list(s). An outbound preview campaign distributes relevant calling records and caller data directly to agents for preview--before the campaign is kicked off.
One way to distribute that data to agents is through the Screen-Pop feature, which literally pops targeted Zendesk data onto the Agent Desktop screen. When you launch your next outbound preview campaign, give agents the useful information they need, before they dive into a sea of calls.
Configuring Screen-Pop
To configure Zendesk data screen-pop for an outbound preview campaign, first make sure you have followed the previous steps to setting up Zendesk integration. Then follow these steps:
Step 1: Confirm that your Zendesk calling records include necessary Zendesk object identifiers.
Before importing a calling list that will be used in this campaign, make sure it contains identifiers (e.g., first name, last name, phone number, and so forth) of the Zendesk objects that are to be displayed on the Agent Desktop when the corresponding calling records are distributed to the agent for preview. These identifiers must be obtained from Zendesk, where they are generated for every ticket and user object. If the calling list is missing the data required, the list will fail to be imported.
Step 2: Name your calling list.
- When importing this calling list, assign type Other to the field containing the Zendesk identifier.
- Give it a descriptive name (e.g., ZendeskID).
Step 3: Tell the Screen-Pop feature which calling list to grab.
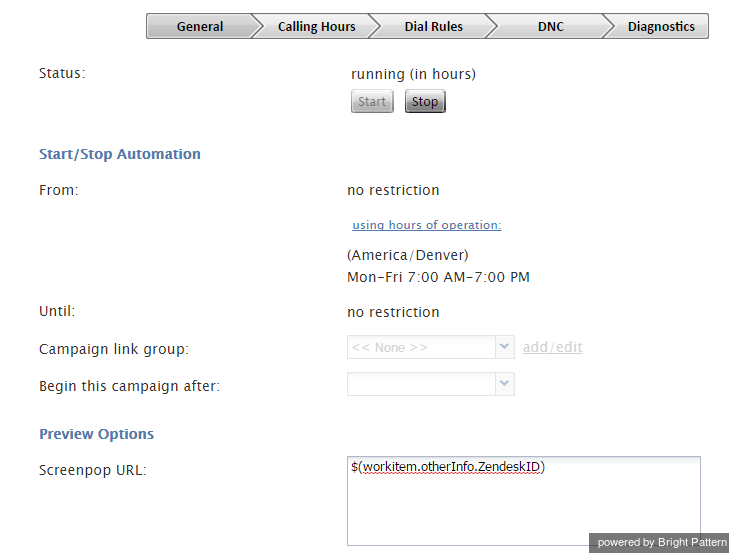
- When configuring the general properties of your preview campaign, set the Screenpop URL parameter to $(workitem.otherInfo.[Zendesk ID field name]), where you replace "[Zendesk ID field name]" with the actual name of the calling list that you just imported. For example, if the name is "ZendeskID," then the Screenpop URL is $(workitem.otherInfo.ZendeskID).
- Save your changes.

