From Bright Pattern Documentation
| Line 2: | Line 2: | ||
Data adapters allow Jaspersoft Studio to use SQL queries to get data from your Reporting Database. In the following procedure, you will create a data adapter that uses the Java Database Connectivity (JDBC) API for the programming language Java, which defines how a database can be accessed by a client. JDBC provides methods to query and update data in a database. | Data adapters allow Jaspersoft Studio to use SQL queries to get data from your Reporting Database. In the following procedure, you will create a data adapter that uses the Java Database Connectivity (JDBC) API for the programming language Java, which defines how a database can be accessed by a client. JDBC provides methods to query and update data in a database. | ||
| − | + | ||
| + | [[File:reporting-db-spec-image2.png|thumb|600px|center|]] | ||
| − | + | == Procedure == | |
| + | To create a data adapter, navigate to the Repository Explorer tab in the left-hand corner of the screen, and proceed through the following steps. | ||
| − | + | === Step 1: Create a data adapter === | |
| − | + | # In ''Repository Explorer'', select and right-click '''Data Adapters'''.<br /><br /> | |
| + | # Then select '''Create Data Adapter'''. | ||
| Line 14: | Line 17: | ||
| + | === Step 2: Choose your connection === | ||
* In the window that pops up, select '''Database JDBC Connection''' and click '''Next'''. | * In the window that pops up, select '''Database JDBC Connection''' and click '''Next'''. | ||
| Line 20: | Line 24: | ||
| − | + | === Step 3: Specify JDBC properties === | |
| − | |||
You will be defining the properties (i.e., driver, database server host, authentication) for the Java Database connection. | You will be defining the properties (i.e., driver, database server host, authentication) for the Java Database connection. | ||
In the window that pops up, specify the following: | In the window that pops up, specify the following: | ||
| − | + | * '''Name:''' Name of the data adapter; note that "New Data Adapter" is the default name but it may be renamed | |
| − | + | * '''JDBC Driver:''' ''org.mariadb.jdbc.Driver'' (Note: copy and paste this driver name into the field, or use the pull-down menu to select this driver.) | |
| − | + | * '''JDBC Url:''' ''jdbc:mariadb://<your database server host name>:3306/< your reporting database name>'' | |
| − | + | * '''Username:''' Username for access to your Reporting Database | |
| − | + | * '''Password:''' Password for access to your Reporting Database | |
| − | |||
| + | Then click '''Finish'''. | ||
| − | + | === Notes === | |
* For database server host name, database name, and username, open the Contact Center Administrator application and navigate to [[contact-center-administrator-guide/ReportingSettings|Reporting Settings]]. | * For database server host name, database name, and username, open the Contact Center Administrator application and navigate to [[contact-center-administrator-guide/ReportingSettings|Reporting Settings]]. | ||
| + | |||
* In the ''JDBC Url'' field, do not include "<" or ">" symbols. Replace "''<your database server host name>''" and "''<your reporting database name>''" with your respective host and database names. | * In the ''JDBC Url'' field, do not include "<" or ">" symbols. Replace "''<your database server host name>''" and "''<your reporting database name>''" with your respective host and database names. | ||
| − | |||
| − | + | ||
</translate> | </translate> | ||
Revision as of 17:30, 29 August 2018
Contents
- Introduction
- Configuring Jaspersoft Studio
- Prerequisites
- Downloading Libraries and Localization Resources
- Importing Libraries
- Importing Localization Resources
- Customizing JRXML Report Templates
- Downloading Report Templates
- Importing and Modifying Report Templates
- Previewing and Saving Modified Report Templates
- Uploading Modified Report Templates
- Customizing BPXML Report Templates
- Appendix
- 1 Creating a Data Adapter
Custom Reporting Tutorial
Creating a Data Adapter
Data adapters allow Jaspersoft Studio to use SQL queries to get data from your Reporting Database. In the following procedure, you will create a data adapter that uses the Java Database Connectivity (JDBC) API for the programming language Java, which defines how a database can be accessed by a client. JDBC provides methods to query and update data in a database.
Procedure
To create a data adapter, navigate to the Repository Explorer tab in the left-hand corner of the screen, and proceed through the following steps.
Step 1: Create a data adapter
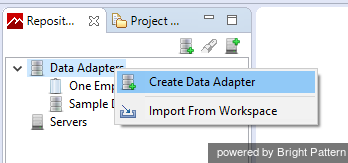
- In Repository Explorer, select and right-click Data Adapters.
- Then select Create Data Adapter.
Step 2: Choose your connection
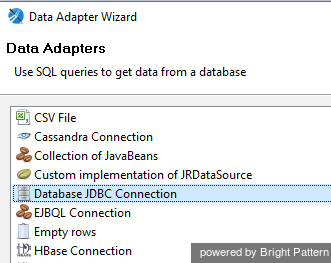
- In the window that pops up, select Database JDBC Connection and click Next.
Step 3: Specify JDBC properties
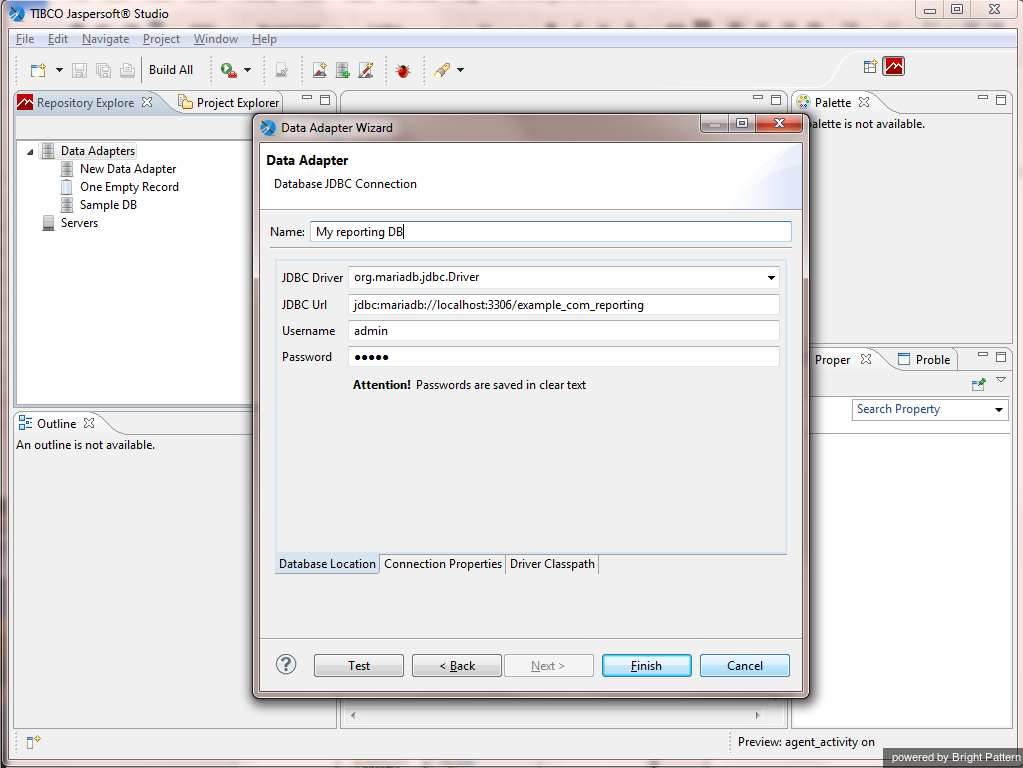
You will be defining the properties (i.e., driver, database server host, authentication) for the Java Database connection.
In the window that pops up, specify the following:
- Name: Name of the data adapter; note that "New Data Adapter" is the default name but it may be renamed
- JDBC Driver: org.mariadb.jdbc.Driver (Note: copy and paste this driver name into the field, or use the pull-down menu to select this driver.)
- JDBC Url: jdbc:mariadb://<your database server host name>:3306/< your reporting database name>
- Username: Username for access to your Reporting Database
- Password: Password for access to your Reporting Database
Then click Finish.
Notes
- For database server host name, database name, and username, open the Contact Center Administrator application and navigate to Reporting Settings.
- In the JDBC Url field, do not include "<" or ">" symbols. Replace "<your database server host name>" and "<your reporting database name>" with your respective host and database names.


