(→Configuring Call Center Parameters) |
|||
| Line 46: | Line 46: | ||
| − | === Step 6: Check phone number prefixes === | + | === Step 6: Create new Lightning app === |
| + | In order to observe the Agent Desktop repeater, you need to create a new Lightning app in ''Setup > Platform Tools > Apps > App Manager'', following the steps of the wizard. | ||
| + | |||
| + | Then click on your newly created Lightning app in App Launcher and observe the repeater in the left bottom corner of the page. | ||
| + | |||
| + | |||
| + | === Step 7: Check phone number prefixes === | ||
# Log in to Bright Pattern's Contact Center Administrator application.<br /><br /> | # Log in to Bright Pattern's Contact Center Administrator application.<br /><br /> | ||
# Make sure that ''Outside Prefix'' is set accordingly to the current ''Dial-out'' entry in the Bright Pattern Contact Center Administrator application. This prefix will be added by Salesforce to any number that will be dialed using the “Click-To-Call” feature. For more information on prefixes, see the ''Contact Center Administrator Guide'', section [[contact-center-administrator-guide/Dial-outEntries|Dial-Out Entries]]. | # Make sure that ''Outside Prefix'' is set accordingly to the current ''Dial-out'' entry in the Bright Pattern Contact Center Administrator application. This prefix will be added by Salesforce to any number that will be dialed using the “Click-To-Call” feature. For more information on prefixes, see the ''Contact Center Administrator Guide'', section [[contact-center-administrator-guide/Dial-outEntries|Dial-Out Entries]]. | ||
| Line 54: | Line 60: | ||
| − | === Step | + | === Step 8: Assign Salesforce.com (SFDC) users to the call center === |
# Go to ''Platform Tools > Feature Settings > Service > Call Center > Call Centers'' and click the name of your call center.<br /><br /> | # Go to ''Platform Tools > Feature Settings > Service > Call Center > Call Centers'' and click the name of your call center.<br /><br /> | ||
# Click the '''Manage Call Center Users''' button at the bottom of the page.<br /><br />[[File:SFDC-Manage-Call-Center-Users.PNG|450px|thumbnail|center|Manage Call Center Users]]<br /><br /> | # Click the '''Manage Call Center Users''' button at the bottom of the page.<br /><br />[[File:SFDC-Manage-Call-Center-Users.PNG|450px|thumbnail|center|Manage Call Center Users]]<br /><br /> | ||
| Line 67: | Line 73: | ||
'''Note:''' To reassign a user to another call center, first remove this user from the currently assigned call center and then add the user to the desired call center. You can view the currently assigned call center in the User Detail page. | '''Note:''' To reassign a user to another call center, first remove this user from the currently assigned call center and then add the user to the desired call center. You can view the currently assigned call center in the User Detail page. | ||
| − | + | === Step 9: Confirm that the new call center is correct === | |
| − | === Step | ||
# Log out of Salesforce and log in again. This step is always required when changing the Agent Desktop URL in call center settings. | # Log out of Salesforce and log in again. This step is always required when changing the Agent Desktop URL in call center settings. | ||
# Return to the newly created call center. You should see the Agent Desktop widget as shown on every page within Salesforce. | # Return to the newly created call center. You should see the Agent Desktop widget as shown on every page within Salesforce. | ||
| Line 136: | Line 141: | ||
| − | + | ||
</translate> | </translate> | ||
Latest revision as of 17:14, 17 September 2018
Configuring Call Center Parameters
After you have defined your call center and installed your managed package, set up the call center parameters that will enable integration with Bright Pattern Contact Center. Note that throughout this guide, configuration instructions are shown for both Salesforce Lightning and Salesforce Classic, where applicable.
Configuration in Salesforce Lightning
Step 1: Manage your call centers in Salesforce
- In Salesforce Lightning view, navigate to Setup.
- Go to Feature Settings > Service > Call Center > Call Centers and click on your call center (i.e., "BrightPattern"). The Call Center Detail page will open.
- If the Introducing Salesforce CRM Call Center splash page appears, click Continue.
Step 2: Edit call center properties
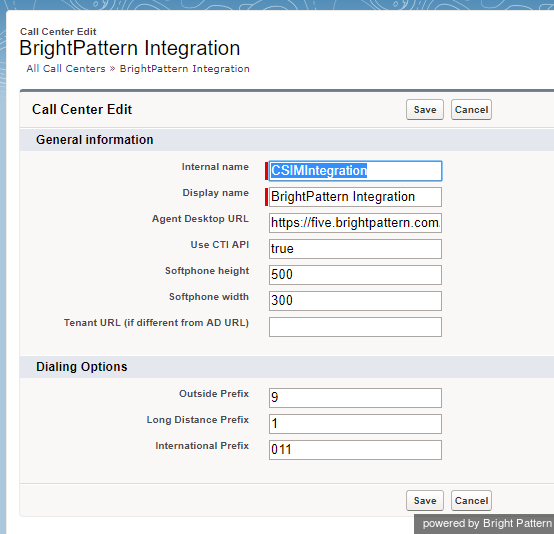
- On the Call Center Detail page, click Edit at the top of the list. The Call Center Edit page opens.
- The most important property to edit is the Agent Desktop URL. In the Agent Desktop URL field, change the URL to the following:
https://<host>:<port>/agentdesktop/AgentDesktop.jsp?enableSFOpenCTI=1&sflogin=1
Make sure to replace <host> with your host name and <port> with your port number. For example, in Salesforce Lightning, your URL might be:
https://tobias_vm:8443/agentdesktop/AgentDesktop.jsp?enableSFOpenCTI=1&sflogin=1 - Leave everything else about the URL the same.
- Optional: Adjust the size of the Agent Desktop call widget that appears on Salesforce on either the homepage (in Classic view) or on every page (in Lightning view). You adjust the size by replacing the default values of the Softphone height and Softphone width fields. The default size is 300 (W) x 500 (H). Note that if the size is too small, the Agent Desktop call widget will appear truncated.
- Click Save.
On the Call Center Detail page, you can optionally adjust the size of the Agent Desktop call widget by specifying the width and height of the widget. The widget remains fixed on every page when using Salesforce Lightning view.
Step 3: Update your tenant access URL details if you have multiple call centers
If you have multiple tenants (i.e., call centers), you should update your tenant access URL information for the particular call center you are configuring.
- On the Call Center Detail page, modify the following Agent Desktop URL by replacing
<tenant-name>.<service-provider-domain-name>
with your Bright Pattern Contact Center tenant access URL (refer to the example below, noting that this URL changes based on the version of Salesforce that you are using):
https://<tenant-name>.<service-provider-domain-name>/agentdesktop?enableSFOpenCTI=1&sflogin=1&apexClass=BrightPattern.CSIMIntegration - Example: https://demo.brightpattern.com/agentdesktop?enableSFOpenCTI=1&sflogin=1&apexClass=BrightPattern.CSIMIntegration
- Modify the Tenant URL by replacing example.com with your fully qualified tenant URL (e.g., example.brightpattern.com).
- Click Save.
Step 4: Enable your identity provider
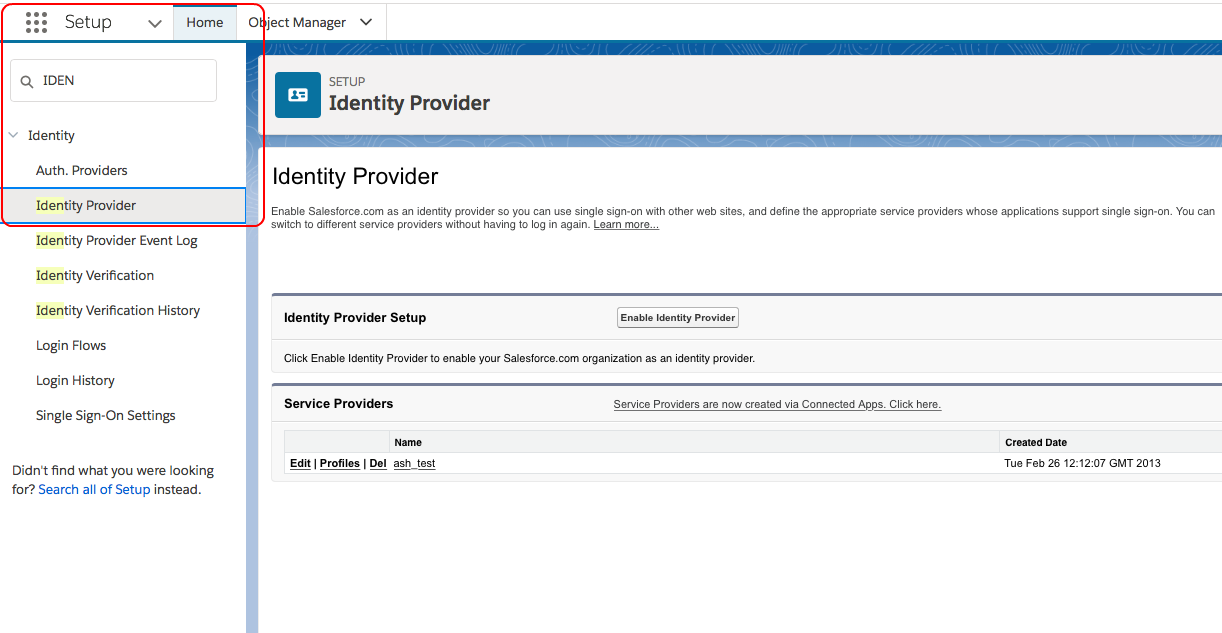
For Salesforce Lightning view, you should enable your identity provider early on in your integration configuration. Once you complete this step, you will not have to do it again. Enabling the identity provider is necessary for enabling single sign-on in the next section of this guide.
- In Salesforce.com, go to Setup and, in the search box, type Identity Provider. Select this option when it appears in the search list.
- Click on Enable Identity Provider.
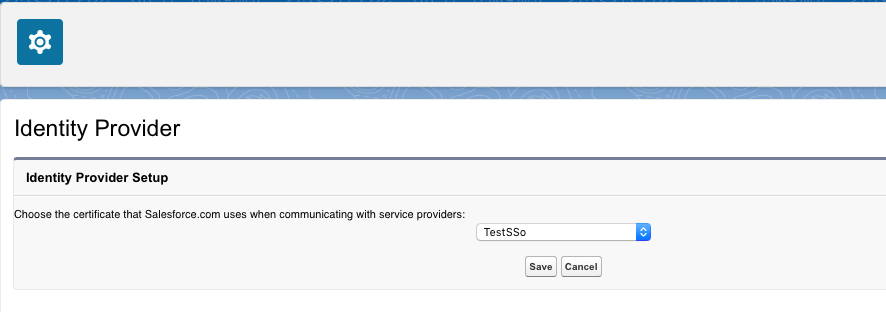
- In Identity Provider Setup, select the actual certificate to be used. If no certificates are shown, you should either create a new self-signed certificate or import a certificate from your setup. For more information, see section How to Add the Certificate.
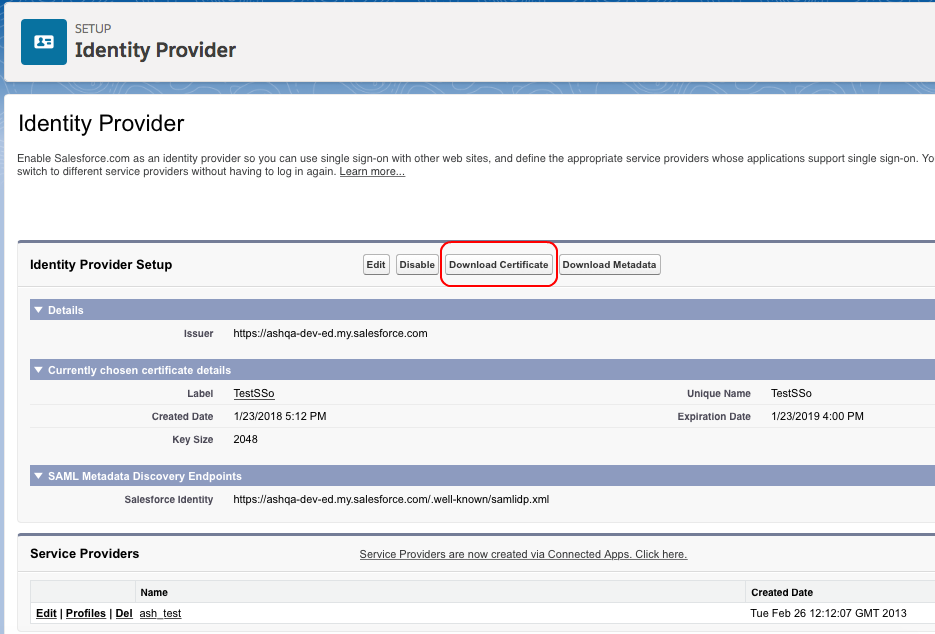
- Use the download certificate button if the certificate was previously downloaded.
Step 5: Edit the BrightPattern Integration app settings
- Go to Platform Tools > Connected Apps > Manage Connected Apps.
- Click BrightPattern in the list of connected apps. This is one of the apps deployed with the package.
Step 6: Create new Lightning app
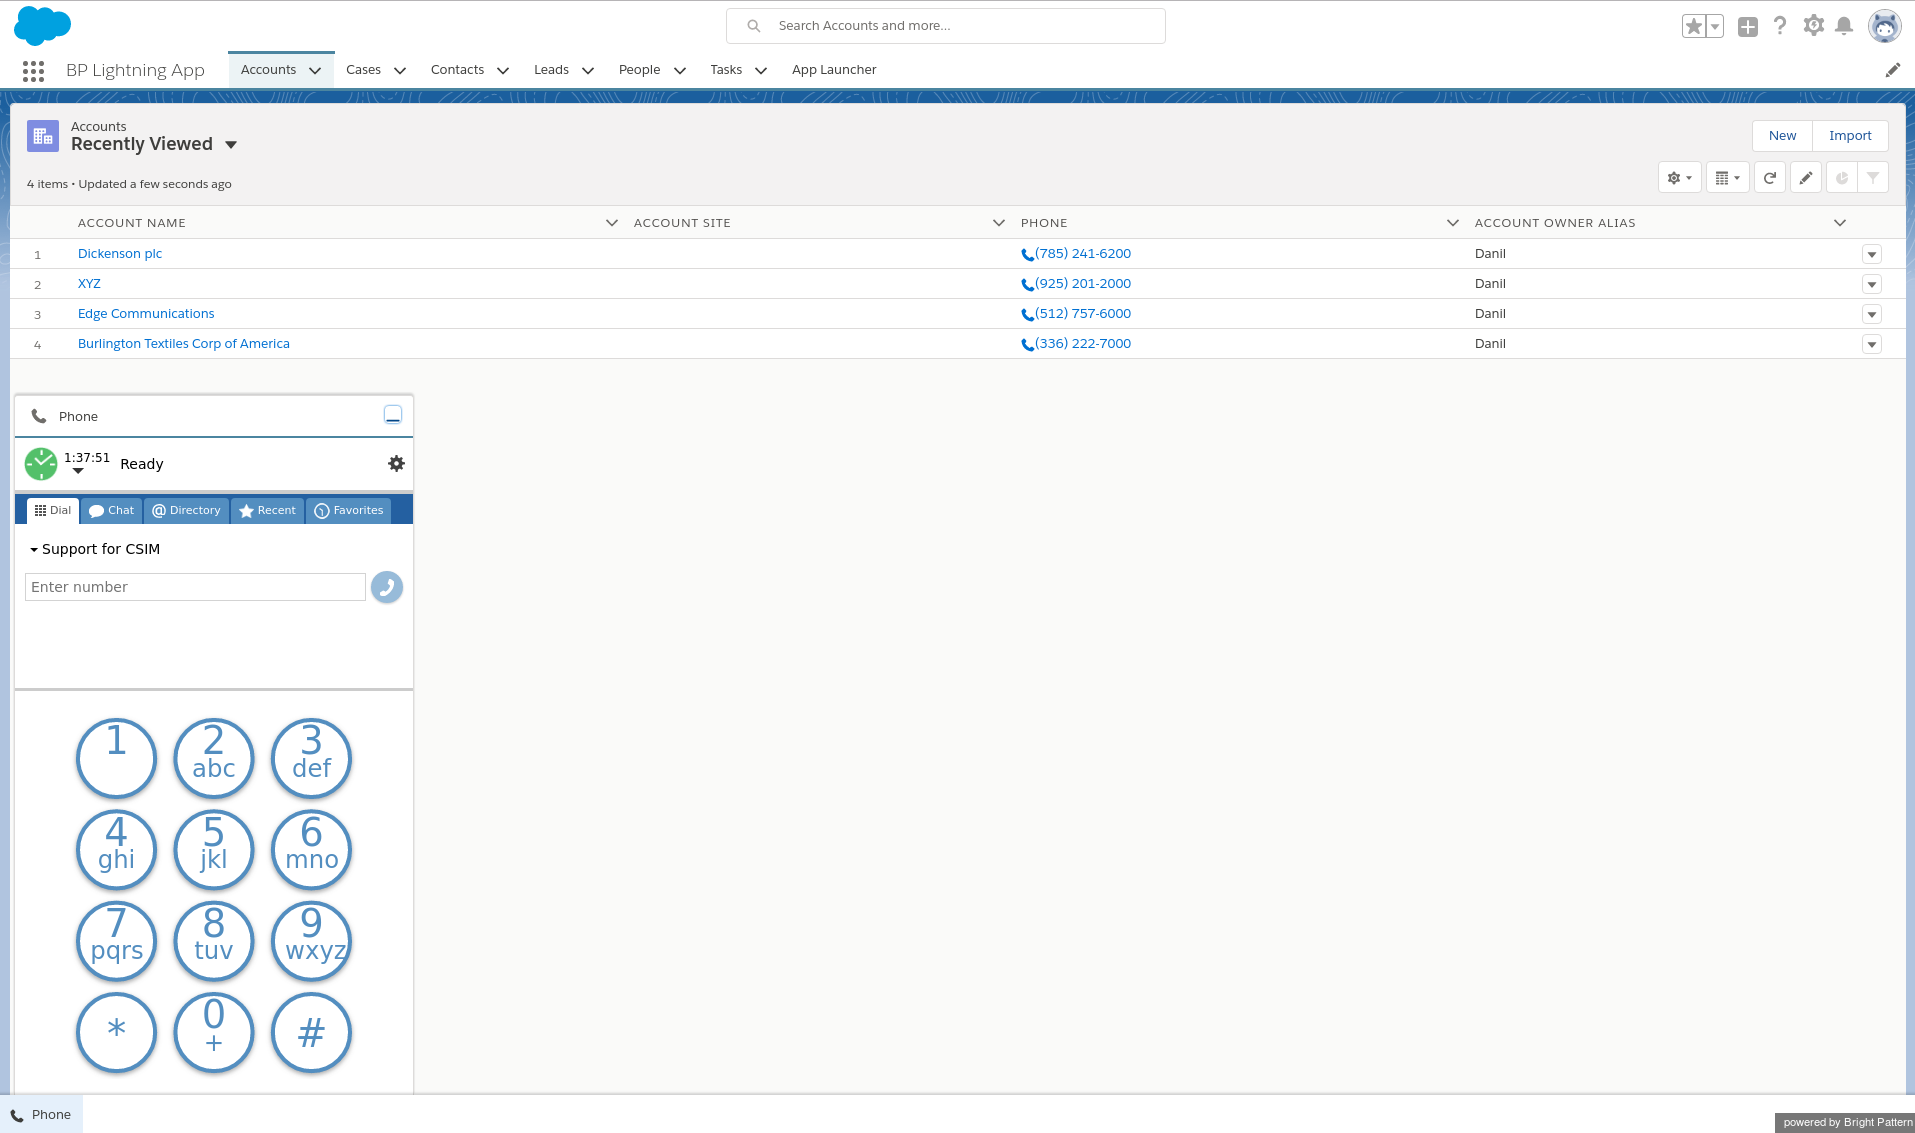
In order to observe the Agent Desktop repeater, you need to create a new Lightning app in Setup > Platform Tools > Apps > App Manager, following the steps of the wizard.
Then click on your newly created Lightning app in App Launcher and observe the repeater in the left bottom corner of the page.
Step 7: Check phone number prefixes
- Log in to Bright Pattern's Contact Center Administrator application.
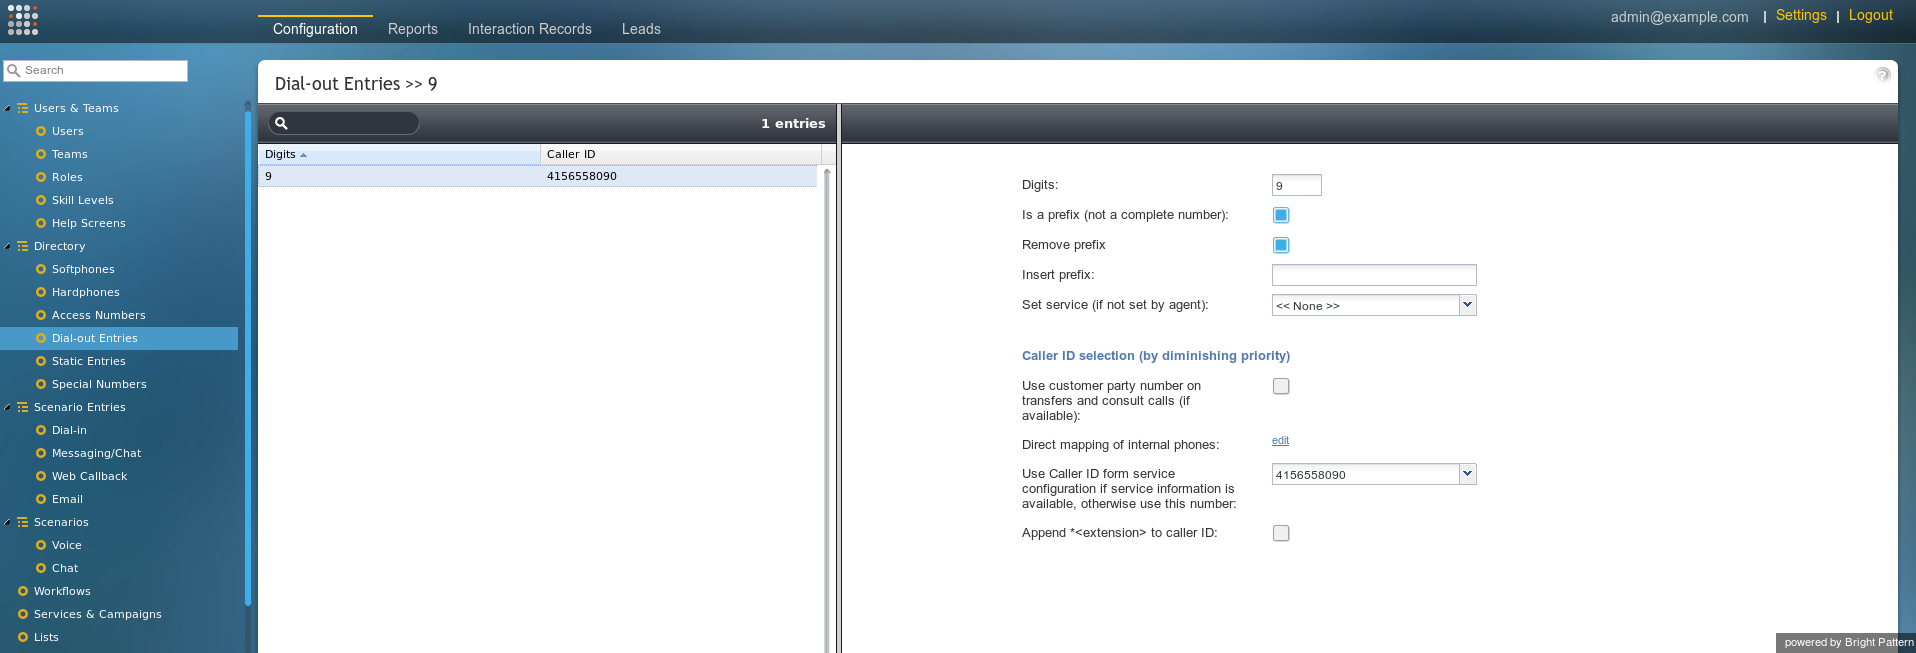
- Make sure that Outside Prefix is set accordingly to the current Dial-out entry in the Bright Pattern Contact Center Administrator application. This prefix will be added by Salesforce to any number that will be dialed using the “Click-To-Call” feature. For more information on prefixes, see the Contact Center Administrator Guide, section Dial-Out Entries.
Step 8: Assign Salesforce.com (SFDC) users to the call center
- Go to Platform Tools > Feature Settings > Service > Call Center > Call Centers and click the name of your call center.
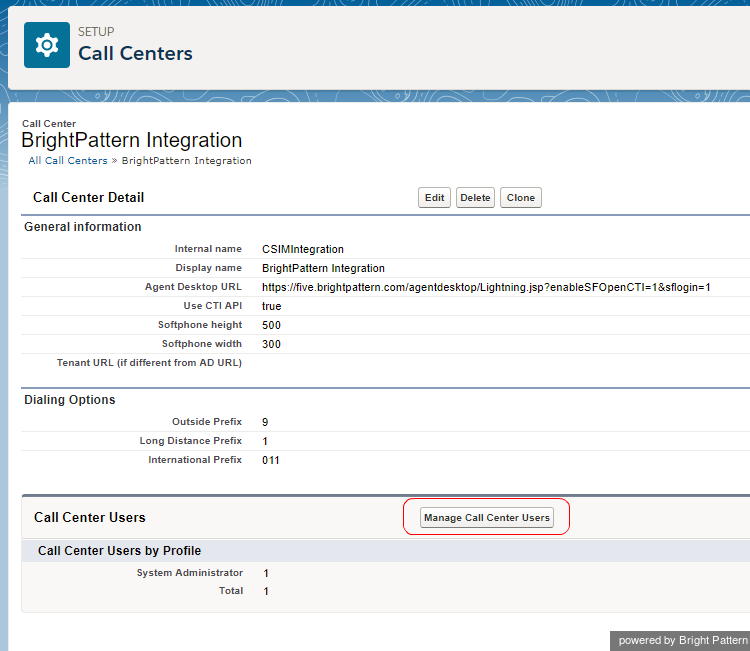
- Click the Manage Call Center Users button at the bottom of the page.
- Select the name of the call center to which you want to assign users.
- In the Call Center Users related list, click Manage Call Center Users.
- On the Manage Users page, click Add More Users.
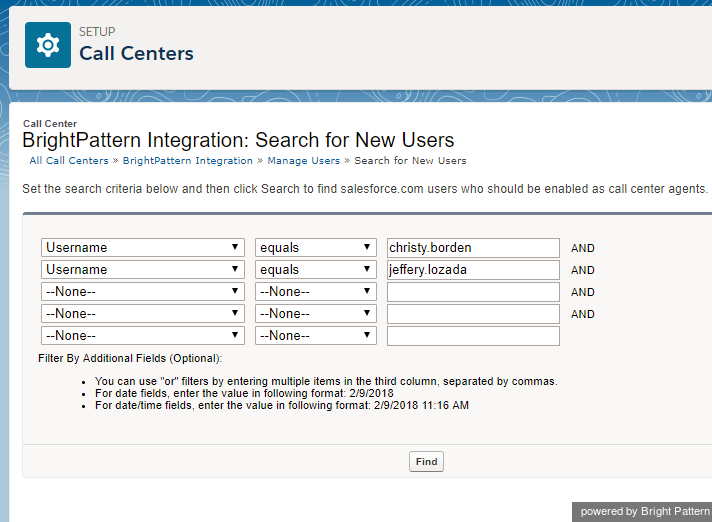
- Specify criteria to find the users who should be assigned to the call center.
- Click Find. Note that all users who already belong to a call center will be excluded from the search results because a user can be assigned to one call center at a time only.
- Select the checkbox next to each user who should be assigned to the call center. At the bottom of the screen, click Add to Call Center.
Note: To reassign a user to another call center, first remove this user from the currently assigned call center and then add the user to the desired call center. You can view the currently assigned call center in the User Detail page.
Step 9: Confirm that the new call center is correct
- Log out of Salesforce and log in again. This step is always required when changing the Agent Desktop URL in call center settings.
- Return to the newly created call center. You should see the Agent Desktop widget as shown on every page within Salesforce.
Configuration in Salesforce Classic
Step 1: Manage your call centers in Salesforce
- In Salesforce Classic view, navigate to Setup.
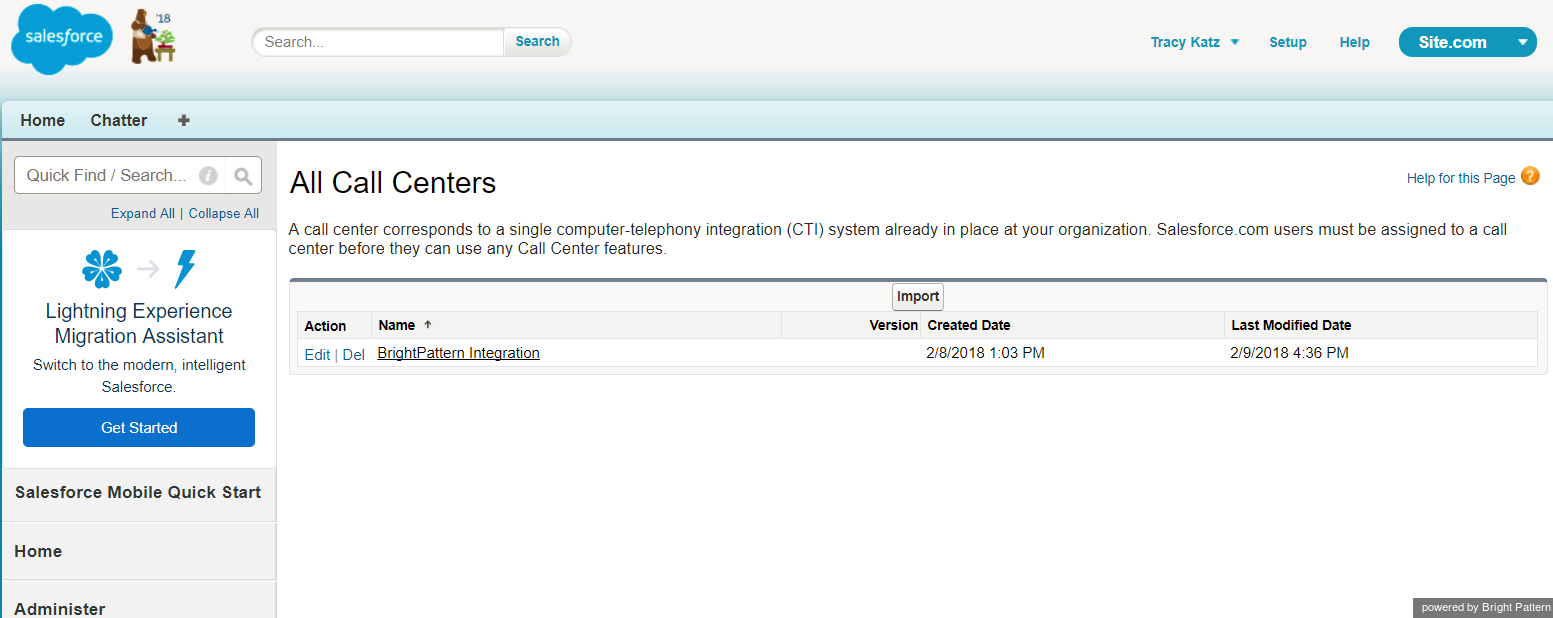
- Go to Build > Call Center > Call Centers and then select BrightPattern from the list. This is the call center you just installed.
- If the Introducing Salesforce CRM Call Center splash page appears, click Continue. The Call Center Detail page will open.
Step 2: Edit call center properties
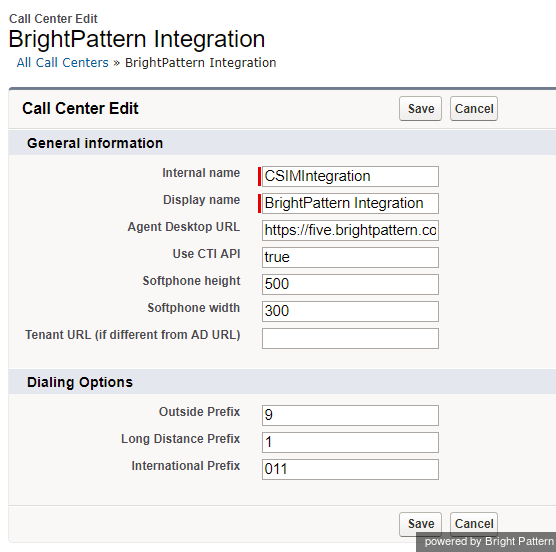
- On the Call Center Detail page, click Edit. The Call Center Detail page opens.
- The most important property to edit is the ACS URL. This is the URL of your Bright Pattern Contact Center Agent Desktop. In the ACS URL field, modify the following Bright Pattern Contact Center Agent Desktop URL by replacing <tenant-name>.<service-provider-domain-name> with your Bright Pattern Contact Center tenant access URL (refer to the example):
https://<tenant-name>.<service-provider-domain-name>/agentdesktop?enableSFOpenCTI=1&sflogin=1&apexClass=BrightPattern.CSIMIntegration
Example: https://demo.brightpattern.com/agentdesktop?enableSFOpenCTI=1&sflogin=1&apexClass=BrightPattern.CSIMIntegration - Leave everything else about the URL the same.
- Optional: Adjust the size of the Agent Desktop call widget that appears on Salesforce on either the homepage (in Classic view) or on every page (in Lightning view). You adjust the size by replacing the default values of the Softphone height and Softphone width fields. The default size is 300 (W) x 500 (H). Note that if the size is too small, the Agent Desktop call widget will appear truncated.
- Click Save.
Step 3: Update your tenant access URL details if you have multiple call centers
If you have multiple tenants (i.e., call centers), you should update your tenant access URL information for the particular call center you are configuring.
- On the Call Center Detail page, modify the following Agent Desktop URL by replacing
<tenant-name>.<service-provider-domain-name>
with your Bright Pattern Contact Center tenant access URL (refer to the example below, noting that this URL changes based on the version of Salesforce that you are using):
https://<tenant-name>.<service-provider-domain-name>/agentdesktop?enableSFOpenCTI=1&sflogin=1&apexClass=BrightPattern.CSIMIntegration - Example: https://demo.brightpattern.com/agentdesktop?enableSFOpenCTI=1&sflogin=1&apexClass=BrightPattern.CSIMIntegration
- Modify the Tenant URL by replacing example.com with your fully qualified tenant URL (e.g., example.brightpattern.com).
- Click Save.
Step 4: Edit the BrightPattern Integration app
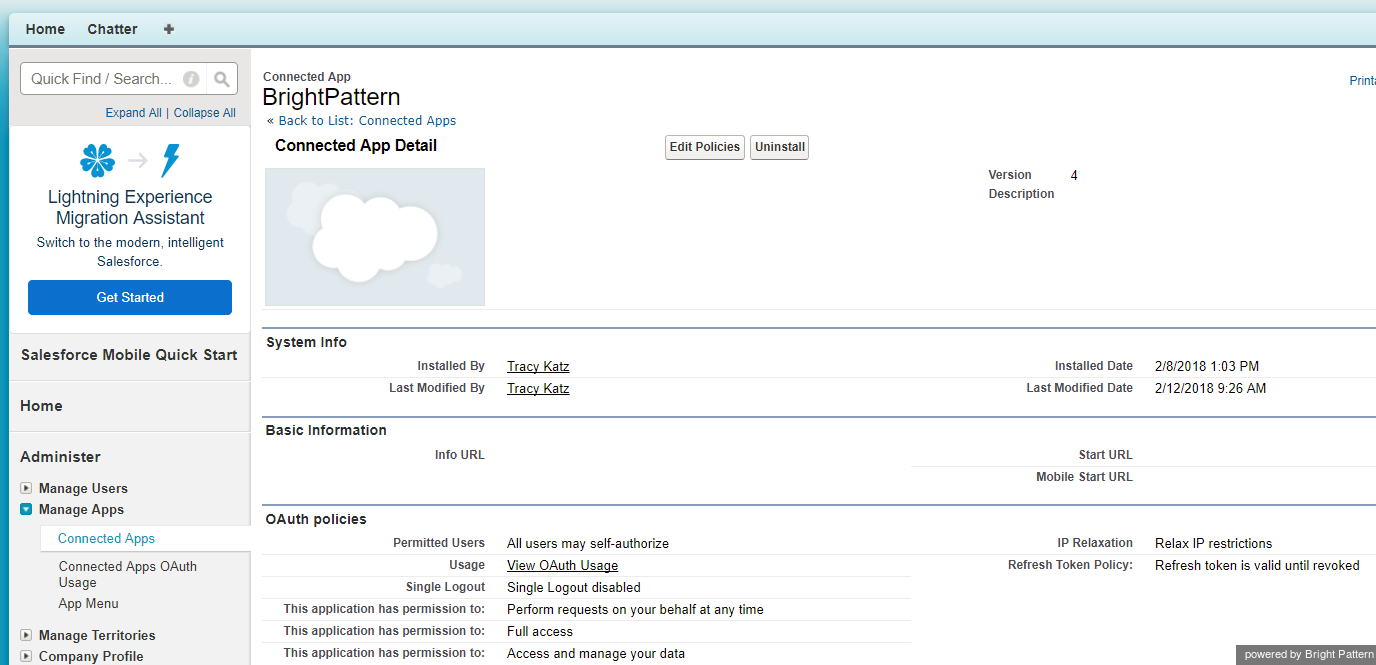
- Go to Administer > Manage Apps > Connected Apps.
- Click BrightPattern in the list of connected apps. This is one of the apps deployed with the package. The Connected App Detail page opens.
Step 5: Check phone number prefixes
- Log in to Bright Pattern's Contact Center Administrator application.
- Make sure that Outside Prefix is set accordingly to the current Dial-out entry in the Bright Pattern Contact Center Administrator application. This prefix will be added by Salesforce to any number that will be dialed using the “Click-To-Call” feature. For more information on prefixes, see the Contact Center Administrator Guide, section Dial-Out Entries.
Step 6: Assign Salesforce.com (SFDC) users to the call center
- Go to Setup > Customize > Call Center > Call Centers.
- On the All Call Center Users page, select the name of the call center to which you want to assign users.
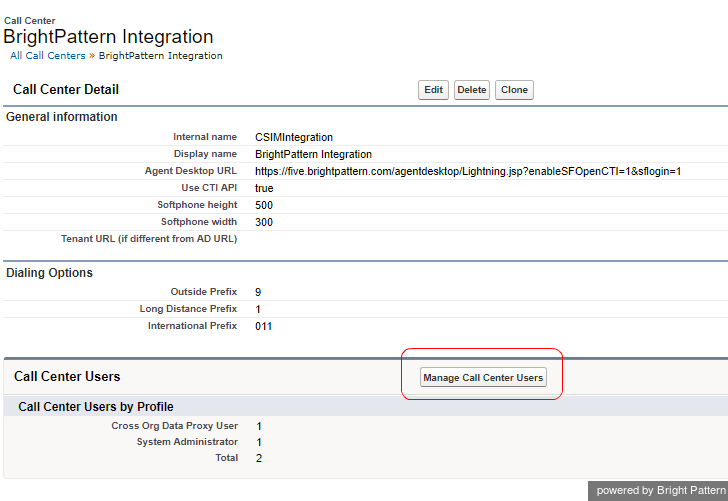
- In the Call Center Detail page , under Call Center Users click Manage Call Center Users.
- Click Add More Users.
- Specify criteria to find the users who should be assigned to the call center.
- Click Find. Note that all users who already belong to a call center will be excluded from the search results because a user can be assigned to one call center at a time only.
- Select the checkbox next to each user who should be assigned to the call center, and click Add to Call Center.
Note: To reassign a user to another call center, first remove this user from the currently assigned call center and then add the user to the desired call center. You can view the currently assigned call center in the “User” detail page.
Step 7: Confirm that the new call center is correct
Return to the newly created call center. You should see the Agent Desktop widget as shown on every page within Salesforce.

