Contents
- Introduction
- Configuration
- Prerequisites
- Zendesk Integration Setup
- Single Sign-On Setup
- Screen-Pop
- 1 Accessing Zendesk Data from Scenarios
- Features and Usage
- Integrated Agent Desktop
- Built-In Softphone and Click-to-Call
- Live Chat and SMS
- Activity History
- Call Center Supervisor
- Using Zendesk Integration Scenario Blocks
Accessing Zendesk Data from Scenarios
If you do not wish to configure your Bright Pattern Contact Center for Single Sign-On with Zendesk, you can access Zendesk data directly from Bright Pattern scenarios instead. The instructions that follow will walk you through the process.
Perform the following preliminary steps only if you skipped the Single Sign-On configuration process; otherwise, proceed directly to Step 1.
- Open the Bright Pattern Contact Center Administrator application.
- Go to Call Center Configuration > Integration Accounts.
- Click Add account, select Zendesk, and click OK.
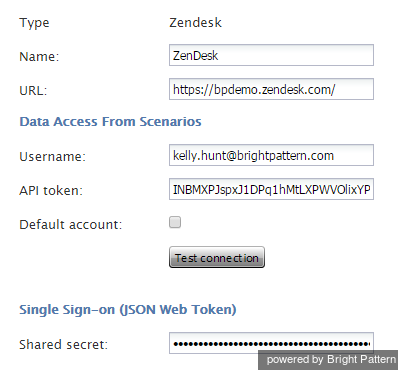
- Create a Name for this integration account.
- Copy your Zendesk domain URL and paste it to the URL field.
- Click Apply to save your changes.
Step 1: Manage settings for your Zendesk API.
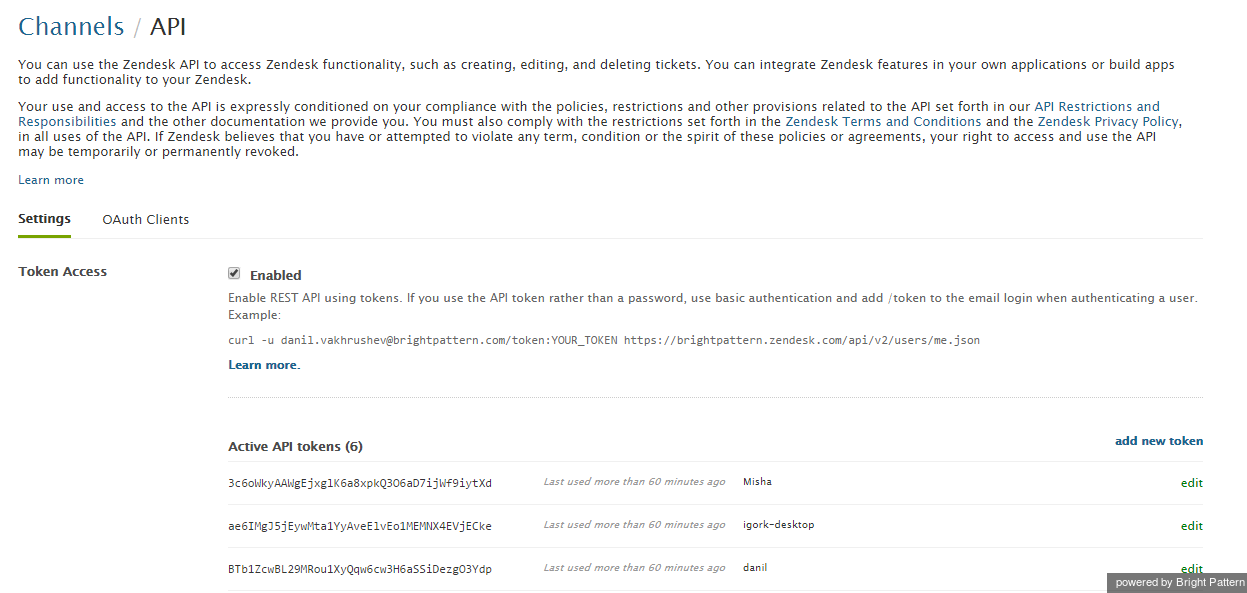
- In Zendesk, go to Admin > Channels > API.
- Make sure Token Access is enabled (i.e., checkbox selected).
- Click the add new token link.
- Enter a label for this new token and click Create. The new token will appear in the Active API tokens list.
Step 2: Save the new token.
- From the Active API tokens list, select the new token and copy it to the clipboard.
- Click Save.
Step 3: In the Bright Pattern Contact Center, set up access to the integrated Zendesk account.
- In the Bright Pattern Contact Center Administrator application, go to Call Center Configuration > Integration Accounts.
- Open the earlier created Zendesk account.
- Paste the clipboard content to the API token field.
- Select the Default account checkbox.
- In the Username field, specify username of the Zendesk account on whose behalf requests for Zendesk data from Bright Pattern scenarios will be made. Make sure this account has sufficient privileges to access all data that may be used in the Bright Pattern Contact Center IVR and routing applications.
- Click Apply.
Step 4: Confirm your connection to Zendesk data.
Click the Test connection button. You should receive confirmation that the connection between the Bright Pattern Contact Center platform and Zendesk data repository is valid.
Step 5: Use scenario blocks to access Zendesk data.
To access Zendesk data and enable screen-pop, use the following blocks of the Bright Pattern Contact Center Scenario Builder application:
- Zendesk Search to obtain Zendesk data
- Zendesk Create Object to create new tickets and users in Zendesk
- Zendesk Update Object to update existing Zendesk tickets and users
- Zendesk Screen Pop to synchronize delivery of calls and related Zendesk records to the agents
- Attached Data to populate custom fields in Zendesk activity history
This Zendesk Integration Guide contains a scenario example that illustrates how the Search and Screen Pop blocks can be used to obtain Zendesk data and display it to the agent upon interaction delivery.
Note that you can create multiple Zendesk integration accounts for access to different Zendesk systems. If you have multiple integration accounts, use scenario block Zendesk Select Account to specify the integration account that will be used by Zendesk blocks in the given scenario. If this block is not used, all Zendesk blocks in the given scenario will use access data from the integration account marked as Default account. (See Step 3.)


