From Bright Pattern Documentation
Contents
- Introduction
- Starting Your Working Session
- Viewing Real-time Metrics
- General Information About Metric Viewing
- Customization of Metric Views
- Understanding Real-time Metrics
- Service Metrics View
- List of Service Metrics
- Skill Metrics View
- List of Skill Metrics
- Agent Metrics View
- List of Agent Metrics
- Real-Time Metric Alerts
- Active Agent Management
- Changing Agent State
- Individual Chat
- Team Chat
- Call Recording
- Call Monitoring, Coaching, and Barge-In
- Continuous Agent Monitoring
- Grading Calls in Progress
- Agent Screen Monitoring
- Managing Calendar Events
- Quality Management
- Campaign Operation
- General Information About Campaign Operation
- General Campaign Metrics View
- 1 Individual Campaign Metrics View
- List of Campaign Metrics
- Quota Metrics View
- List of Quota Metrics
- Campaign Start and Stop
- Lists View
- List of List Metrics
- Enabling and Disabling Lists within a Campaign
- Campaign Teams View
- Adding and Removing Campaign Teams
- Email Queue Management
- General Information About Email Queue Management
- Assigning Email to an Agent
- Managing My Queues (Personal Email Queues)
Supervisor Guide
Individual Campaign Metrics View
In addition to the general campaign view described in the previous section, you can define a custom metrics view for each campaign individually. To define a custom view for a particular campaign, first select this campaign in the general metrics view.
The name of the selected campaign will appear under the general campaign view with a predefined set of metrics.
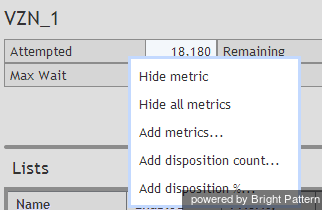
To make any changes in the current set of metrics, click the black triangle that appears next to a metric name when you mouse over it. A menu of customization options will appear.
Customization Options
The following customization options are given in the pull-down menu.
- Hide metric allows you to hide the metric for which the menu was invoked.
- Hide all metrics allows you to hide all metrics currently present in the individual campaign view.
- Add metrics allows you to add any metric from the set of the available campaign metrics. Simply select Add metrics and select the desired metrics from the menu that appears. (You can use the green “+” sign for the same purpose.) The metrics in this menu are the same as in the General Campaign Metrics View; for their descriptions, see section List of Campaign Metrics
- Add disposition count allows you to add a metric for the number of call attempts with a specific disposition since the beginning of the reporting interval. Simply select Add disposition count and select the desired disposition from the menu that appears. You can use the green “+” sign for the same purpose.
- Add disposition % allows you too add a metric for the percentage of call attempts with a specific disposition relative to the total number of call attempts made since the beginning of the reporting interval. Simply select Add disposition % and select the desired disposition from the menu that appears. You can use the green “+” sign for the same purpose.


