Contents
- Introduction
- Integration Steps
- Prerequisites
- Installing a Managed Package
- Configuring Call Center Parameters
- Enabling Single Sign-On
- Enabling Access to SFDC Data from Scenarios
- Importing Calling Lists and Exporting Campaign Results
- Customizing SFDC Activity Objects
- Configuring SFDC Data Screen-pop for Outbound Preview Campaigns
- Frequently Asked Questions
- Searching for a contact using the Salesforce.com Search block
- 1 Locating or creating the screen-pop URLs for an SFDC Object
- Enabling the Service Console (or Service Cloud)
Locating or creating the screen-pop URLs for an SFDC Object
The SFDC integration provides the ability to access defined SFDC Objects as screen-pop candidates through the use of the associated screen-pop Scenario Block URL – typically supplied by the SFDC System Administrator; however, the following process is a single sample to derive the SFDC Object screen-pop URLs on your own.
ServicePattern uses the Salesforce.com Scree-pop scenario block to display SFDC records (objects) on the Agent Desktop. This block not only allows the selection of an individual Object ID, but will also accommodate SFDC URLs for screen-pop objects.
- Note: The Object ID URL may differ between Service Cloud and Sales Cloud, thus a single Scenario may or may not work across the enterprise.
Locating SFDC Screen-pop URLs for Sales Cloud
Utilizing Salesforce, perform the desired task manually that you wish to perform via the Screen-pop URL. For example, I’m interested in opening a new case from an Account and a specific Contact within Sales Cloud. From within Sales Cloud, select > Accounts, then scroll down to Contacts. Select a sample Contact. From the Contact record, scroll down to Cases, and then select “New Case”. A new Case record should open:
Copy the page URL as our starting reference:
The URL identifies the SFDC Object parameters required for your Screen-pop. The initial SFDC URL segment is not required (https://bpdemo-dev-ed.my.salesforce.com/) and should be removed – the desktop integration will use the configured domain URL. The result is:
500/e?retURL=%2F003E000000NoeJj&def_contact_id=003E000000NoeJj&def_account_id=001E000000NK3Pl
The Object parameters contact_id and account_id would be replaced by the Scenario defined Objects/variables. For example:
500/e?retURL=%2F003E000000NoeJj&def_contact_id=$(SFContact.Id)&def_account_id=$(SFContact.Account.Id)
Common Object ID identifiers (as identified by the 3 leading field characters):
- 001 = Account
- 003 = Contact
- 00T = Task
Typically, the retURL or Return URL is not desired unless the requirement is to return to a specific Object. By removing the Return URL the default action will be to return to the original work Object.
Remove: retURL=%2F003E000000NoeJj&
Final URL: 500/e?def_contact_id=$(SFContact.Id)&def_account_id=$(SFContact.Account.Id)
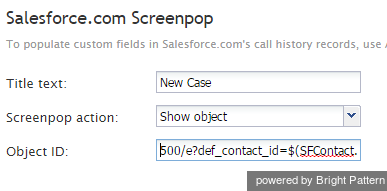
This URL will be placed in the Screen-pop Block Object ID:
Locating SFDC Screen-pop URLs for Service Cloud (Service Console)
Utilizing Salesforce, perform the desired task manually that you wish to perform via the Screen-pop URL. For example, I’m interested in opening a new case from an Account and a specific Contact within Service Cloud. From within Service Cloud, select > Accounts, then scroll down to a specific Account. Select a sample Account. From the Account record selected, scroll down to Contacts, then select a sample Contact to work with. From the Contact record, scroll down to Cases, and then select “New Case”. A new Case record should open. To locate the behind the scenes url – select the down arrow on the left side (as shown below):
Select “New Case”, edit link. This should result in the “Link to Share” dialog box.
Three options are available:
- Include all primary tabs and subtitles
- Include only this tab
- Create standard Salesforce URL
Select “Include only this tab” to provide the simple URL for the screen-pop described.
Copy the page URL as our starting reference:
The URL identifies the SFDC Object parameters required for your Screen-pop. The initial SFDC URL segment is not required (https://bpdemo-dev-ed.my.salesforce.com/) and should be removed – the desktop integration will use the configured domain URL. The result is:
console#%2F500%2Fe%3Fdef_contact_id%3D003E000000NoeJk%26def_account_id%3D001E000000NK3Pm
The Object parameters def_contact_id and def_account_id would be replaced by the Scenario defined Objects/variables. The URI data format is as follows (for reference only):
%3D = “=”
%26 = “&”
%2F = “/”
%3F = “?”
Thus the result would be:
console#%2F500%2Fe%3Fdef_contact_id%3D$(SFContact.Id)%26def_account_id%3D$(SFContact.Account.Id)
Common Object ID identifiers (as identified by the 3 leading field characters):
- 001 = Account
- 003 = Contact
- 00T = Task
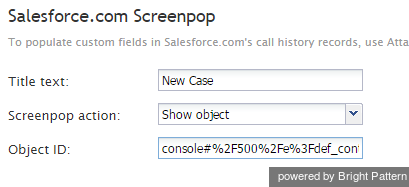
This URL will be placed in the Screen-pop Block Object ID:


