From Bright Pattern Documentation
Contents
- Introduction
- Integration Steps
- Prerequisites
- Installing a Managed Package
- Configuring Call Center Parameters
- Enabling Single Sign-On
- Enabling Access to SFDC Data from Scenarios
- Importing Calling Lists and Exporting Campaign Results
- Customizing SFDC Activity Objects
- 1 Configuring SFDC Data Screen-pop for Outbound Preview Campaigns
- Frequently Asked Questions
- Searching for a contact using the Salesforce.com Search block
- Locating or creating the screen-pop URLs for an SFDC Object
- Preventing the Salesforce.com screenpops from opening another tab
- Enabling the Service Console (or Service Cloud)
Salesforce.com Integration Guide
Configuring SFDC Data Screen-pop for Outbound Preview Campaigns
To configure SFDC Data Screen-pop for Outbound Preview Campaigns:
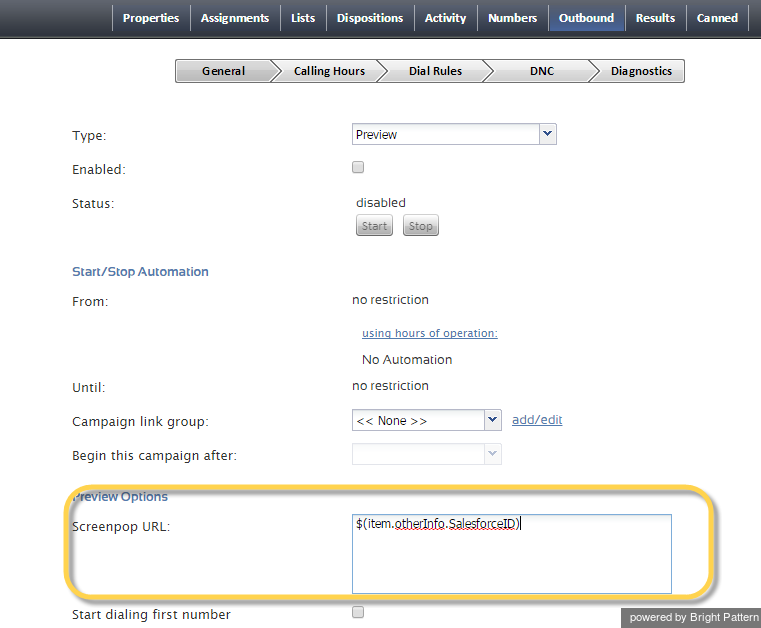
- In the Contact Center Administrator application, select the desired preview campaign from the list of Services and Campaigns, and click the Outbound tab.
- Set the Screen-pop URL parameter to $(item.otherInfo.SalesforceID), where SalesforceID is the desired List field name being referenced.
- In the calling list(s) associated with this campaign, create a new List field designated as SalesforceID.
- For each calling record of the list, use the SalesforceID field (or desired field name) to specify the identifier of the SFDC object that is to be displayed at the Agent Desktop when this record is distributed to the agent for Preview Campaigns. This field identifier will originate from SFDC; every SFDC record/entry has an ID field that uniquely identifies that record.
SFDC objects of the following types can be used: Cases, Accounts, and Contacts.
The Salesforce ID (field identifier) or each record will be posted to SFDC via the Preview Screen-Pop URL.

