Contents
- Introduction
- General Information
- Contact Center Configuration Process
- Initial General Configuration
- Inbound Voice and Chat Service Configuration
- Outbound Campaign Configuration
- Email Service Configuration
- Users and Teams
- Overview
- Users
- Forwarding and Voicemail Operation
- Teams
- Agent Dashboard Metrics
- Roles
- Privileges
- Skill Levels
- Help Screens
- Directory
- Scenario Entries
- Scenarios
- Services and Campaigns
- Services and Campaigns Overview
- Properties Tab
- Assignments Tab
- Lists Tab
- Dispositions Tab
- Activity Tab
- Numbers Tab
- Service Level Tab
- Outbound Tab
- Results Tab
- Archive Tab
- Canned Tab
- Email Tab
- Pre-defined Dispositions
- Outbound - General
- Outbound - Calling Hours
- Outbound - Dial Rules
- Outbound - DNC
- Outbound - Diagnostics
- Forms
- Lists
- Tasks
- Call Center Configuration
- General Settings
- Integration Accounts
- Knowledge Base
- Calendars
- Hours of Operation
- State Calling Hours
- Auxiliary Skills
- Audio Treatments
- Shared Voice Segments
- Voicemail
- Omni-Channel Routing
- Chat Settings
- Email Settings
- Quality Management
- Reporting
- Security
- Appendices
- Countries, Calling Codes, and Time Zones
- System Requirements
- Agent Desktop Helper Application
- Licenses
- Glossary
Call Recording
For text-based services, the system unconditionally stores all chat transcripts and emails for the period of time agreed upon with your service provider.
Call recording is configured in Quality Management > Call Recording in the Contact Center Administrator application. Note: Call Recording is enabled automatically when a supervisor begins monitoring.
How to Set Up Call Recording
For voice services, you can specify the percentage of calls that will be recorded relative to all calls of your contact center (i.e., both internal and service calls).
Step 1: Navigate to Call Recording.
From the Quality Management menu on the left-hand side of the Contact Center Administrator application, select Call Recording.
Step 2: Set the percentage of call recording.
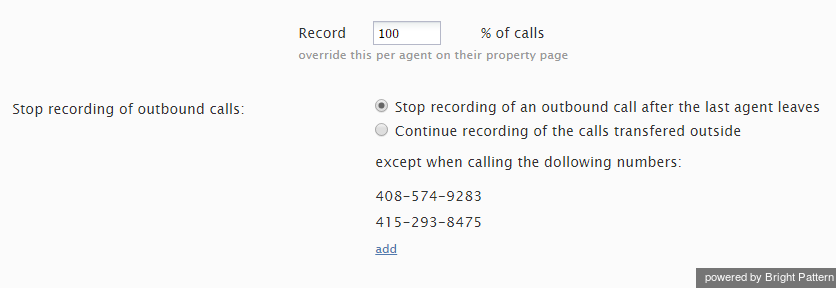
- By default, calls are not recorded. To set a percentage, enter the desired value in the Record field.
- Note that you can set the percentage of recorded calls individually for each user. These individual settings will override the contact center setting for the corresponding users.
- You can also set the percentage of recorded service calls individually for specific services. These service-level settings will also override the contact level setting for the corresponding services.
- Stored recordings of service calls can be automatically exported out of the system at regular intervals.
Additionally, note that this configuration setting can be overridden by the following actions (listed in the order from least to most powerful):
- Configuration settings for a specific service
- Configuration settings for a specific user
- Value of scenario variable $(doNotRecord)
- Manual pause/resume recording commands by Agent/Supervisor
- Automatic recording when a call is monitored
- Presume recording using corresponding desktop API methods
- Value of scenario variable $(banVoiceRecording)
How to Stop Recording on External Call Transfer
For voice services, you can discontinue call recording upon transferring a call to an external number.
Instances in which you may not want to record calls include when
- Customers require calls not to be recorded after transfer to an external number.
- Customers require just the consult portion of the call to be recorded in order to have reference data for the agent.
- Agents must not record calls when transferring to a specific agent.
Call recording is enabled and disabled from Quality Management > Call Recording in the Contact Center Administrator application.
The following steps outline how to stop call recording on external call transfer.
Step 1: Navigate to Call Recording.
Follow the above steps for how to set up call recording. From the Quality Management menu on the left-hand side of the Contact Center Administrator application, select Call Recording.
Step 2: Select when and how you want to stop recording.
Under Stop recording of outbound calls, select one of two options:
- Stop recording of an outbound call after the last agent leaves, which allows an agent to make a consult call to a public switched telephone network (PSTN) destination (i.e., an external phone number), complete the transfer, and have the call recording continue if the agent’s call was recorded. The call will not be recorded once the agent leaves.
- Continue recording of the calls transferred outside, which specifies that the call will be recorded even after transfer.
Step 3: Create exceptions (if needed).
To create exceptions to your call recording/stopping selections, click add. Adding phone numbers allows you to stop recording when transferring to specific clients, as well as to stop call recording after transfer on a per-service basis.
The default value is to stop recording. If you want recording to continue upon transfer, you must make your selection from Call Recording.


