Contents
- Introduction
- Starting Your Working Session
- Starting Agent Desktop
- Selecting a Phone Device
- Logging into Agent Desktop
- Installing and Updating the Agent Desktop Helper Application
- User Interface Overview
- Changing Your Agent Desktop Appearance
- Understanding Screen-pop
- Configuring Your User Profile
- Configuring Your Voicemail
- Listening to Voicemail Messages
- Call Forwarding
- Using the Calendar
- Getting Help
- Understanding and Handling Your States
- How to Interpret Your Current State Information
- How to Make Yourself Ready
- How to Make Yourself Not Ready
- Handling Calls
- How to Answer an Incoming Call
- How to Reject an Incoming Call
- How to Make an Internal Call
- How to Make an Outbound Call
- How to Send Numeric Information
- How to Use the Directory
- How to Redial a Previously Dialed Number
- How to Use Favorite Contacts
- How to Mute a Call
- How to Release a Call
- How to Wrap Up After Call Work
- Dispositions and Notes
- How to Hold and Retrieve a Call
- How to Make a Consultation Call
- How to Transfer a Call
- How to Host a Conference
- How to Participate in a Conference
- How to Place a Call in a Service Queue
- How to Connect a Voice Application to Your Call
- How to Use Prerecorded Messages
- How to Record a Call
- How to Stop or Pause Call Recording
- Voice Signatures
- How to Schedule a Follow-up Activity
- How to Send SMS Messages
- Participating in an Outbound Campaign
- General Information About Outbound Campaigns
- 1 How to Review a Calling Record
- How to Reject a Calling Record
- How to Reschedule a Call Attempt
- Handling Service Chats
- How to Accept a Chat Request
- How to Reject a Chat Request
- Chat Messages
- How to Send and Receive Pictures and Documents
- How to Transfer Your Chat Session
- How to Create and Edit Canned Chat Responses
- How to End a Chat Session
- Handling Multiple Chat Sessions
- Handling Mobile Interactions
- Handling Email
- General Information About Handling Email
- Understanding Email Cases and Threads
- How to Accept an Email
- How to Retrieve an Email from the Team Queue
- How to Retrieve an Email from My Queue
- Overview of the Email Working Area
- How to Review an Incoming Email
- How to Mask Sensitive Data
- How to Close an Email without Replying
- How to Change an Assigned Email Service
- How to Transfer an Email
- How to Forward an Email
- How to Change Default Email Font
- How to Compose a Reply
- How to Use My Follow-ups to Send a Follow-up Outbound Email
- How to Use Cases to Send a Follow-up Outbound Email
- How to Send a New Outbound Email
- How to Save an Email as a Draft
- Knowledge Base
- General Information About Knowledge Base
- How to Use a Knowledge Base Article
- Contributing Content to the Knowledge Base
- Other Useful Functions
- Dashboard
- Keyboard Shortcuts
- Ways to Request Assistance
- How to Use Internal Chat
- How to Report a Call Quality Problem
- How to Send Agent Desktop Application Logs to Your Administrator
- Ending Your Working Session
- Error Messages
How to Review a Calling Record
Calling records, also known as campaign records, include detailed information about a call interaction. This information includes customer name, phone number(s), customer history, previous attempts to contact the customer, and so forth. Campaign records are accessible to agents on the Agent Desktop application. You can access calling records in the following way.
Step 1: Preview campaign records.
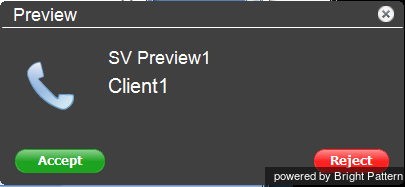
- When a campaign record is delivered to your desktop, you will see a pop-up window titled Preview, which indicates a preview request. A preview allows you to review campaign records before attempting to contact a customer. The pop-up window will display the campaign name and the customer name.
- Click Accept to review the record. (Note that depending on your contact center practices, calling records delivered to your desktop may be automatically accepted for you.)
- Notice that your state will change from Ready to Busy.
Step 2: Review available information.
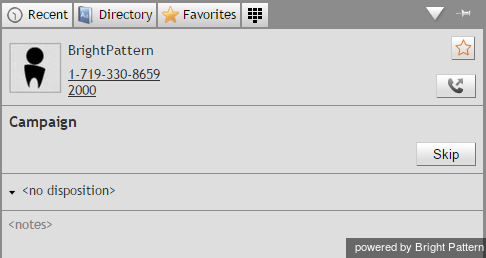
- View the customer name and phone numbers from the preview record in the Contact Info Panel.
- Click the History tab to see if there have been any previous attempts to contact this customer within the given campaign.
- Notice that you will continue to be in the Busy state while reviewing the record. You can make yourself Not Ready at any time during the review of the given record if you want to make yourself unavailable for any subsequent review requests.
Step 3: Either complete the record or call the customer.
After reviewing the record, you can take one of the following approaches.
If the record appears to have some incorrect or missing information:
- Select the disposition corresponding to this situation.
- Click the Complete button to finish processing of this record within the campaign. (The default disposition is called Bad Record, but it may be redefined in you contact center. If in doubt, consult your system administrator.)
- Your state will change from Busy to Ready, and you are likely to receive another preview request shortly.
If the information in the record appears to be valid, but you cannot handle it for any reason:
- Click the Skip button. The system will remove the record from your desktop, and will attempt to distribute it later.
- Unless you make yourself Not Ready before clicking Skip, your state will change from Busy to Ready, and you are likely to receive another preview request soon. * Note that each instance of skipping a record will be accounted for in the contact center reports.
If the information in the record appears to be valid and you are ready to call this customer:
- Click the phone number in the Addresses area.
- If there are multiple numbers, the number recommended for dialing at this time according to the campaign configuration will be marked with a green circle. (Note that depending on your contact center practices, you may be given a certain amount of time to review the record before the system will dial its preferred number automatically.)
- A call attempt to the selected number will be initiated, and the subsequent call handling will be no different from any regular outbound call, except that you would normally be required to set a call disposition according to the call result. For more information, see sections How to Enter Dispositions and Notes and How to Reschedule a Call Attempt.


