Contents
- Introduction
- Scenario Builder Application
- Scenario Blocks
- Accept
- Add to Calling List
- Answer
- Attached Data
- Collect Digits
- Comment
- Connect Call
- Connect Chat
- DB Execute
- Exception Handler
- Exit
- Fetch URL
- Find Agent
- Get Next Record
- Get Statistics
- Get User Configuration
- Goto
- If
- Internal Message
- Log
- Menu
- Play Prompt
- Record
- Request Callback
- Request Input
- Request Skill or Service
- RightNow Create Object
- RightNow Screen Pop
- RightNow Search
- RightNow Select Account
- RightNow Update Object
- Salesforce.com Delete
- Salesforce.com Insert
- Salesforce.com Screenpop
- Salesforce.com Search
- Salesforce.com Update
- Save Survey Response
- Self-Service Provided
- Search Directory
- Send Message
- Set Agent State
- Set Disposition
- Set Priority
- Set Prompt Language
- Set Variable
- Start Another Scenario
- Stop Prompt
- Voicemail
- Wait
- Web Screen Pop
- Zendesk Create Object
- 1 Zendesk Screen Pop
- 2 Web Screen Pop Block with Zendesk Integration
- Zendesk Search
- Zendesk Select Account
- Zendesk Update Object
- Variables and Expressions
- Voice Segment Types
- Scenario Example
Zendesk Screen Pop
The Zendesk Screen Pop scenario block specifies Zendesk data to be displayed for the agent when the interaction is connected to this agent through the Connect Call or Connect Chat block.
Settings
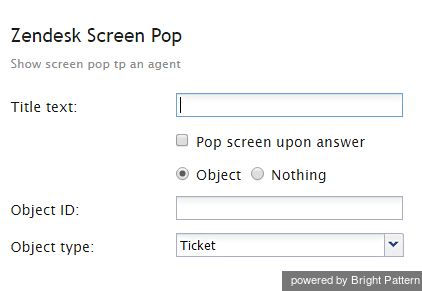
Title text
Title text is the name of the instance of the block. Enter a name in the text field and click the Update button at the bottom of the Edit pane. The new name of the block appears in the flowchart.
Pop screen upon answer
By default, the screen pop occurs as soon as the interaction is delivered to the agent (i.e., during the alert phase); select this checkbox if you want the screen pop to occur when the agent accepts the interaction for handling.
Object
Use this option when the scenario can precisely identify the object associated with the interaction. A Zendesk page with the object properties will be displayed to the agent.
Object ID
Object ID is the identifier of the Zendesk object to be displayed. It must be specified if the Object option is selected. It may be specified as an application variable in the $(varname) format.
Object type
This is the type of the Zendesk object to be displayed. It can be either a ticket or a user.
Nothing
The available interaction data cannot be used to identify any relevant Zendesk records. Use the Nothing option to cancel screen pop of a specific Zendesk page that may have been set by a previous use of this block in the same scenario.
Web Screen Pop Block with Zendesk Integration
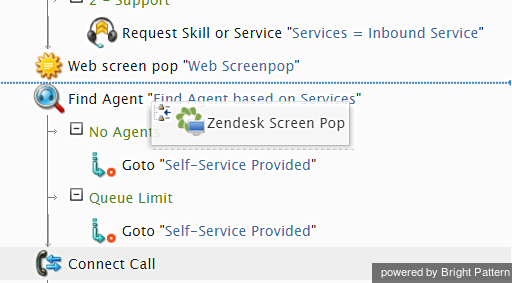
The scenario engine enables both web screen pop and CRM screen pop (i.e., Zendesk Screen Pop) by using subsequent blocks in a scenario. The scenario engine controls such screen pop configuration and sends information about all enabled screen pops to the Agent Desktop application.
Step 1: Place screen pop blocks on your scenario.
- In the Bright Pattern Contact Center Scenario Builder, drag a Web Screen Pop scenario block onto the scenario.
- Drag a Zendesk Screen Pop scenario block onto the scenario, beneath the Web Screen Pop block.
Step 2: Configure settings for each screen pop block.
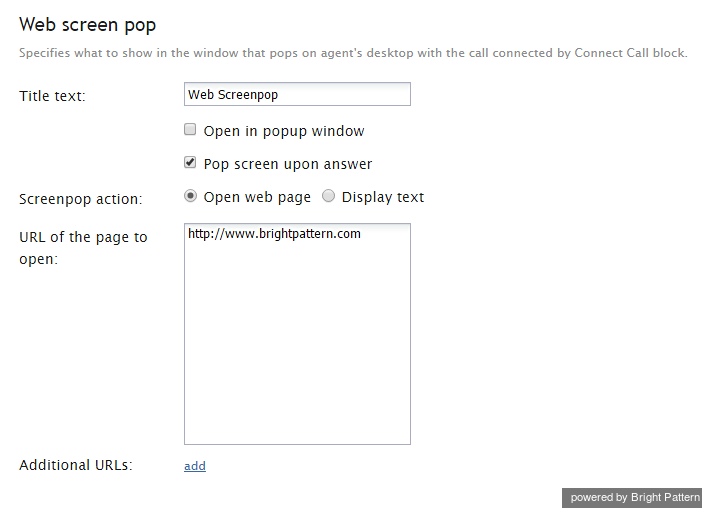
In order for screen pop to work, you must specify the settings for each block. Web Screen Pop settings include Title text, Screenpop action, the URL of the page to open, and Additional URLs (if any). Checking the boxes determines whether screen pops open in a pop-up window and if screen pop is enabled when an interaction is answered.
Agents accepting interactions in the Agent Desktop application should now receive any enabled screen pops on the desktop interface.
For more information on screen pop, refer to the Agent Guide.


