Contents
- Introduction
- Starting Your Working Session
- Starting Agent Desktop
- Selecting a Phone Device
- Logging into Agent Desktop
- Installing and Updating Agent Desktop Helper Application
- User Interface Overview
- Changing Your Agent Desktop Appearance
- Understanding Screen-pop
- Configuring Your User Profile
- Configuring Your Voicemail
- Listening to Voicemail Messages
- Call Forwarding
- Using the Calendar
- Getting Help
- Understanding and Handling Your States
- How to Interpret Your Current State Information
- How to Make Yourself Ready
- How to Make Yourself Not Ready
- Handling Calls
- How to Answer an Incoming Call
- How to Reject an Incoming Call
- How to Make an Internal Call
- How to Make an Outbound Call
- How to Send Numeric Information
- How to Use the Directory
- How to Redial a Previously Dialed Number
- How to Use Favorite Contacts
- How to Mute a Call
- How to Release a Call
- How to Wrap Up After-call Work
- How to Enter Dispositions and Notes
- How to Hold and Retrieve a Call
- How to Make a Consultation Call
- How to Transfer a Call
- How to Host a Conference
- How to Participate in a Conference
- How to Place a Call in a Service Queue
- How to Connect a Voice Application to Your Call
- How to Use Pre-recorded Messages
- How to Record a Call
- How to Stop or Pause Call Recording
- How to Collect a Voice Signature
- How to Schedule a Follow-up Activity
- How to Send SMS Messages
- Participating in an Outbound Campaign
- General Information About Outbound Campaigns
- How to Review a Calling Record
- How to Reject a Calling Record
- How to Reschedule a Call Attempt
- Handling Service Chats
- How to Accept a Chat Request
- How to Reject a Chat Request
- How to Send Chat Messages
- How to Transfer Your Chat Session
- 1 How to Create and Edit Canned Chat Responses
- How to End a Chat Session
- Handling Multiple Chat Sessions
- Handling Mobile Interactions
- Handling Email
- General Information About Handling Email
- Understanding Email Cases and Threads
- How to Accept an Email
- How to Retrieve an Email from the Team Queue
- How to Retrieve an Email from Your Personal Queue
- Overview of the Email Working Area
- How to Review an Incoming Email
- How to Mask Sensitive Data
- How to Close an Email without Replying
- How to Change an Assigned Email Service
- How to Transfer an Email
- How to Forward an Email
- How to Compose a Reply
- How to Send a Follow-up Outbound Email
- How to Send a New Outbound Email
- How to Save an Email as a Draft
- Knowledge Base
- General Information About Knowledge Base
- How to Use a Knowledge Base Article
- Contributing Content to the Knowledge Base
- Other Useful Functions
- Dashboard
- Ways to Request Assistance
- How to Use Internal Chat
- How to Report a Call Quality Problem
- How to Send Agent Desktop Application Logs to Your Administrator
- Ending Your Working Session
- Error Messages
How to Create and Edit Canned Chat Responses
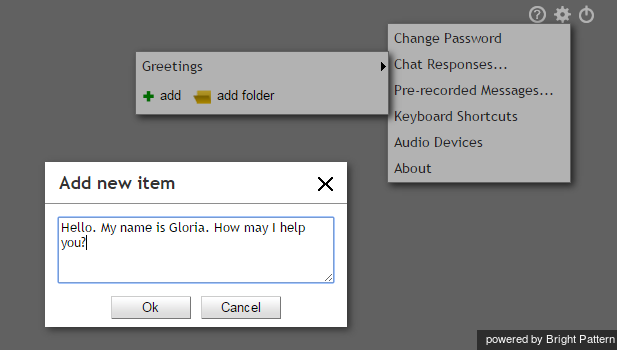
You can create your own canned chat responses and edit the existing ones. Click the Settings icon in the upper right corner of the desktop and select the Chat Responses option. A list of the previously defined responses will appear.
To edit an existing chat response, select it from the list by clicking it. The text of the response will appear in an editable field. Make the desired changes and click OK to confirm. Note that you can also delete a response while in the Edit window.
To define a new chat response, click the add option. Type the desired text in the editable field and click the OK to confirm.
To arrange your canned responses in folders, click add folder, enter a folder name, and click OK. The new folder will appear in the list. To open the folder, click its name.
Note that depending on your permissions, you may be able to make the chat responses that you create available to all agents in your contact center. If you have such permissions, you will see the for all agents checkbox in the Edit window.
The following variables can be used in canned chat responses:
%AF – for agent’s first name
%AL – for agent’s last name
%F – for customer’s first name
%L – for customer’s last name

