Contents
- Introduction
- Starting Your Working Session
- Starting Agent Desktop
- Selecting a Phone Device
- Logging into Agent Desktop
- Installing and Updating Agent Desktop Helper Application
- User Interface Overview
- 1 Changing Your Agent Desktop Appearance
- Understanding Screen-pop
- Configuring Your User Profile
- Configuring Your Voicemail
- Listening to Voicemail Messages
- Call Forwarding
- Using the Calendar
- Getting Help
- Understanding and Handling Your States
- How to Interpret Your Current State Information
- How to Make Yourself Ready
- How to Make Yourself Not Ready
- Handling Calls
- How to Answer an Incoming Call
- How to Reject an Incoming Call
- How to Make an Internal Call
- How to Make an Outbound Call
- How to Send Numeric Information
- How to Use the Directory
- How to Redial a Previously Dialed Number
- How to Use Favorite Contacts
- How to Mute a Call
- How to Release a Call
- How to Wrap Up After-call Work
- How to Enter Dispositions and Notes
- How to Hold and Retrieve a Call
- How to Make a Consultation Call
- How to Transfer a Call
- How to Host a Conference
- How to Participate in a Conference
- How to Place a Call in a Service Queue
- How to Connect a Voice Application to Your Call
- How to Use Pre-recorded Messages
- How to Record a Call
- How to Stop or Pause Call Recording
- How to Collect a Voice Signature
- How to Schedule a Follow-up Activity
- How to Send SMS Messages
- Participating in an Outbound Campaign
- General Information About Outbound Campaigns
- How to Review a Calling Record
- How to Reject a Calling Record
- How to Reschedule a Call Attempt
- Handling Service Chats
- How to Accept a Chat Request
- How to Reject a Chat Request
- How to Send Chat Messages
- How to Transfer Your Chat Session
- How to Create and Edit Canned Chat Responses
- How to End a Chat Session
- Handling Multiple Chat Sessions
- Handling Mobile Interactions
- Handling Email
- General Information About Handling Email
- Understanding Email Cases and Threads
- How to Accept an Email
- How to Retrieve an Email from the Team Queue
- How to Retrieve an Email from Your Personal Queue
- Overview of the Email Working Area
- How to Review an Incoming Email
- How to Mask Sensitive Data
- How to Close an Email without Replying
- How to Change an Assigned Email Service
- How to Transfer an Email
- How to Forward an Email
- How to Compose a Reply
- How to Send a Follow-up Outbound Email
- How to Send a New Outbound Email
- How to Save an Email as a Draft
- Knowledge Base
- General Information About Knowledge Base
- How to Use a Knowledge Base Article
- Contributing Content to the Knowledge Base
- Other Useful Functions
- Dashboard
- Ways to Request Assistance
- How to Use Internal Chat
- How to Report a Call Quality Problem
- How to Send Agent Desktop Application Logs to Your Administrator
- Ending Your Working Session
- Error Messages
Changing Your Agent Desktop Appearance
You can personalize the appearance of your Agent Desktop application in a number of ways.
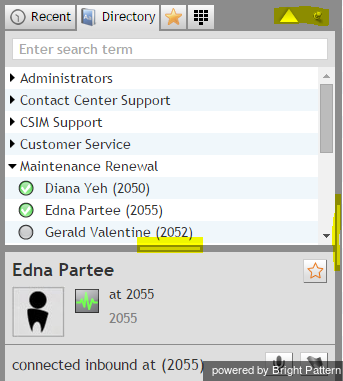
You can use the vertical splitter that separates the Context Information Area and the horizontal splitter above the Contact Info Panel to re-size those elements according to your current needs and preferences.
Also note the little pin icon in the lower left corner of the Recent Contacts, Directory, Favorite Contacts and Dial Pad section. It can be used to keep this section visible in your Agent Desktop at all times. If you click to unpin it
, this section will collapse automatically when you make a call or start a chat in order to provide more room for the Contact Info Panel.
Even if you normally prefer to keep your Recent Contacts, Directory, Favorite Contacts and Dial Pad visible (i.e., pinned), you can still collapse them manually when you need more room for the Contact Info Panel. To collapse them manually, use the triangle icon next to the tabs .
The content displayed in the Context Information Area depends entirely on the type of services that you provide. In some cases, this area may not be used at all. Instead, other applications that you use for interaction processing may be displayed in separate browser tabs/windows. In this case, you may find it convenient to remove the Context Information Area altogether, and to set out the remaining elements of the Agent Desktop application in a separate narrow browser window, which will occupy less space on your desktop but still provide quick access to all interaction handling functions.
To minimize your agent desktop, click the Pop-out icon in the top-right corner of the application screen.
The left part of your Agent Desktop will appear in a pop-out window which can be moved to any location on your screen.
To return to the full Agent Desktop view, click the same icon again.
- Note: If you do not see the pop-out icon, this is usually an indication that you do not have permission to run Agent Desktop in the minimized view. Another reason why this function may not be available to you is that your currently assigned role implies access to some of the information in the Context Information Area. In either case, your system administrator can check and, if necessary, modify your permissions in order to enable this function.
Your preferences for the Agent Desktop appearance will be remembered for your subsequent login sessions when you log out.


